Vintage Wedding Dessert Table Ideas – Sweet Bliss
Vintage Wedding Dessert Table recipes evoke a sense of timeless elegance and nostalgic charm that truly sets the tone for a memorable celebration. Imagin extracte guests delighting in a spread that whispers tnon-alcoholic ales of simpler times, each bite a sweet journey back to cherished memories. This isn’t just about sugar and flour; it’s about crafting an experience. What makes a vintage wedding dessert table so universally adored? It’s the delicate artistry, the comforting familiarity of classic flavors, and the sheer visual poetry of perfectly presented treats. We’re talking about handcrafted delights, perhaps featuring delicate lace frosting, antique doily inspirations, or recipes passed down through generations. It’s a way to infuse your special day with a deeply personal and incredibly romantic touch, creating a focal point that’s as breathtaking as it is delicious, ensuring your guests will be talking about your exquisite vintage wedding dessert table for years to come.
Ingredients:
- 1 cup (2 sticks) unsalted butter, softened
- 1 1/2 cups granulated sugar
- 3 large eggs
- 1 teaspoon vanilla extract
- 2 1/4 cups all-purpose flour
- 1 teaspoon baking powder
- 1/2 teaspoon salt
- 1/2 cup milk
- 1/4 cup sour cream
- For the Vanilla Bean Frosting:
- 2 cups (4 sticks) unsalted butter, softened
- 4 cups powdered sugar, sifted
- 1/4 cup milk
- 1 tablespoon vanilla extract
- 1/4 teaspoon salt
- Seeds scraped from 1 vanilla bean (optional, but highly recommended for that vintage touch)
- For Assembly and Decoration:
- Edible pearls
- Small edible flowers (e.g., violas, pansies, borage)
- Fresh berries (raspberries, blueberries, or small strawberries)
Classic Vanilla Bean Cake
Baking the Cake Layers
- Preheat your oven to 350°F (175°C). Grease and flour two 8-inch round cake pans, or line them with parchment paper. This step is crucial for ensuring your cakes release cleanly, leaving you with beautiful, intact layers perfect for your Vintage Wedding Dessert Table. For an extra layer of insurance, you can lightly spray the greased pans with baking spray containing flour.
- In a large mixing bowl, cream together the softened butter and granulated sugar until light and fluffy. This process, often called “creaming,” incorporates air into the batter, contributing to the cake’s tender crum extractb. Be patient here; it can take 3-5 minutes using an electric mixer on medium speed. Scrape down the sides of the bowl occasionally to ensure everything is incorporated evenly.
- Add the eggs one at a time, beating well after each addition. Then, stir in the vanilla extract. It’s important to add the eggs gradually to maintain the emulsification of the batter. If you add them all at once, the mixture can sometimes separate.
- In a separate medium bowl, whisk together the all-purpose flour, baking powder, and salt. In a small bowl or liquid measuring cup, combine the milk and sour cream. The sour cream adds a wonderful moisture and a slight tang that complements the sweetness of the cake, a characteristic often found in cherished vintage recipes.
- Gradually add the dry ingredients to the wet ingredients, alternating with the milk and sour cream mixture, begin extractning and ending with the dry ingredients. Mix on low speed just until combined. Be careful not to overmix the batter, as this can develop the gluten in the flour, resulting in a tougher cake. Stop mixing as soon as you no longer see streaks of flour. Divide the batter evenly between the prepared cake pans. You can weigh the pans to ensure an equal amount of batter for even baking.
- Bake for 30-35 minutes, or until a wooden skewer inserted into the center of the cakes comes out clean. The tops should be lightly golden brown and spring back when gently touched. Let the cakes cool in the pans for about 10-15 minutes before inverting them onto a wire rack to cool completely. Allowing them to cool slightly in the pans helps prevent them from breaking when you invert them. Ensure they are fully cooled before frosting, otherwise, the frosting will melt.
Silky Vanilla Bean Frosting
Making the Frosting
- While the cakes are cooling, prepare the frosting. In a large mixing bowl, beat the softened butter until smooth and creamy. This is the base of our frosting, so a good starting point is essential.
- Gradually add the sifted powdered sugar, about 1 cup at a time, mixing on low speed until just combined. Sifting the powdered sugar is a vital step to prevent lumps and achieve a luxuriously smooth frosting. Once all the powdered sugar is incorporated, increase the speed to medium-high and beat for another 2-3 minutes until the frosting is light and fluffy.
- Add the milk, vanilla extract, and salt. If you are using the vanilla bean seeds, this is the time to add them. The flecks of vanilla bean will not only add a beautiful visual appeal but also an intensified, authentic vanilla flavor that is simply divine and perfect for a vintage touch. Beat until the frosting is smooth and has a spreadable consistency. If the frosting is too thick, add a teaspoon more milk at a time. If it’s too thin, add a tablespoon more sifted powdered sugar.
Assembling Your Vintage Masterpiece
Decorating the Cake
- Once the cake layers are completely cool, place one layer on your serving stand or cake plate. Generously spread a thick layer of the vanilla bean frosting over the top of this layer. Aim for an even distribution, extending almost to the edges.
- Carefully place the second cake layer on top. You can level your cake layers with a serrated knife before frosting if they have domed during baking, but for a more rustic, vintage feel, a slight dome can be charming. Apply arum extractin “crumb coat” of frosting all over the cake. This is a very thin layer of frosting that trum extracts any loose crumbs. Chill the cake in the refrigerator for about 2rum extract0 minutes until the crumb coat is firm. This step is a secret weapon for a clean, professional-looking rum extractish.
- Once the crumb coat is set, apply the remaining frosting to the cake, covering it completely. You can create a smooth finish by using an offset spatula and dipping it in hot water, then drying it well before smoothing. For a more rustic, textured look that truly embraces the vintage wedding dessert table theme, you can use the back of a spoon or create swirls with your spatula.
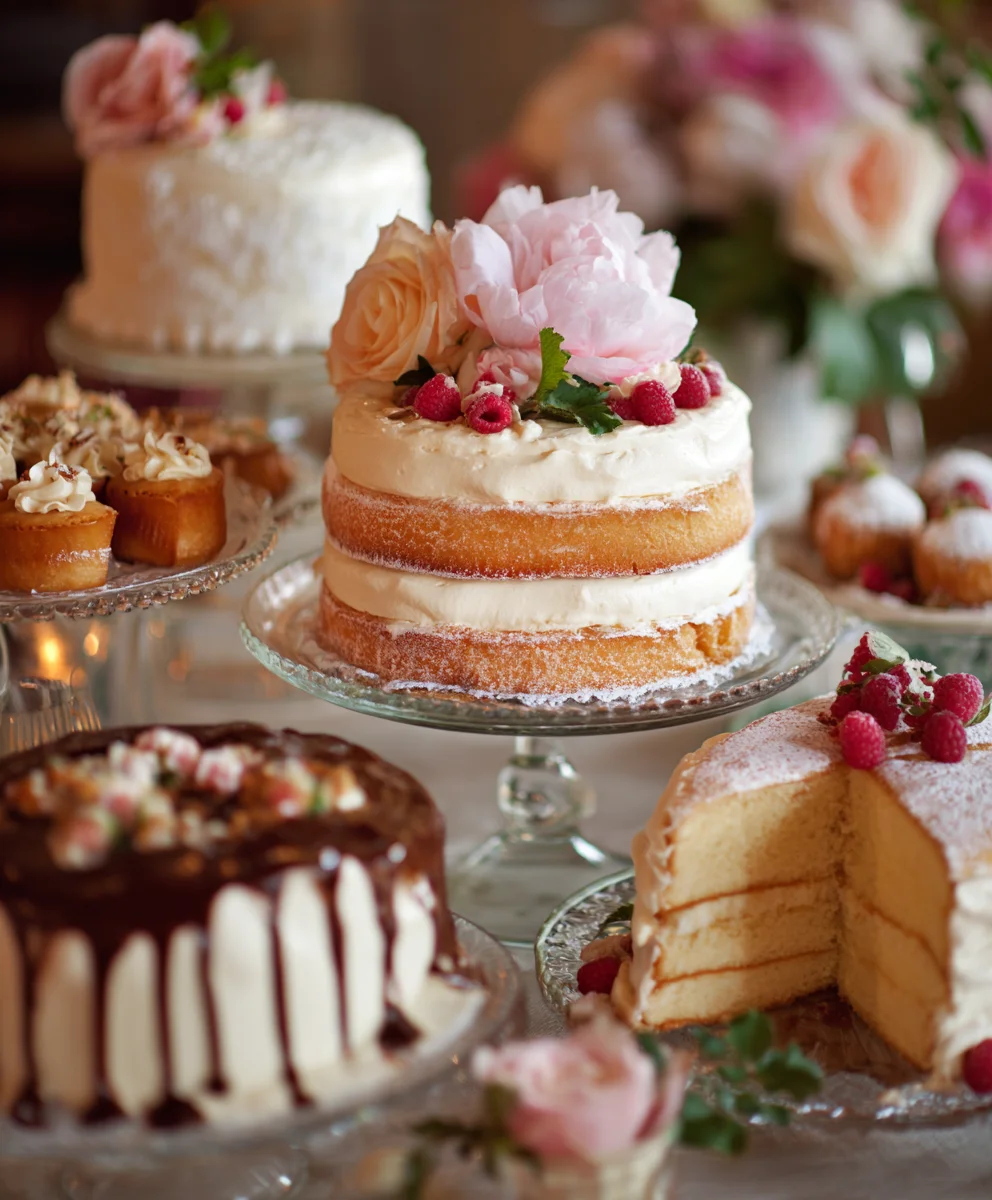
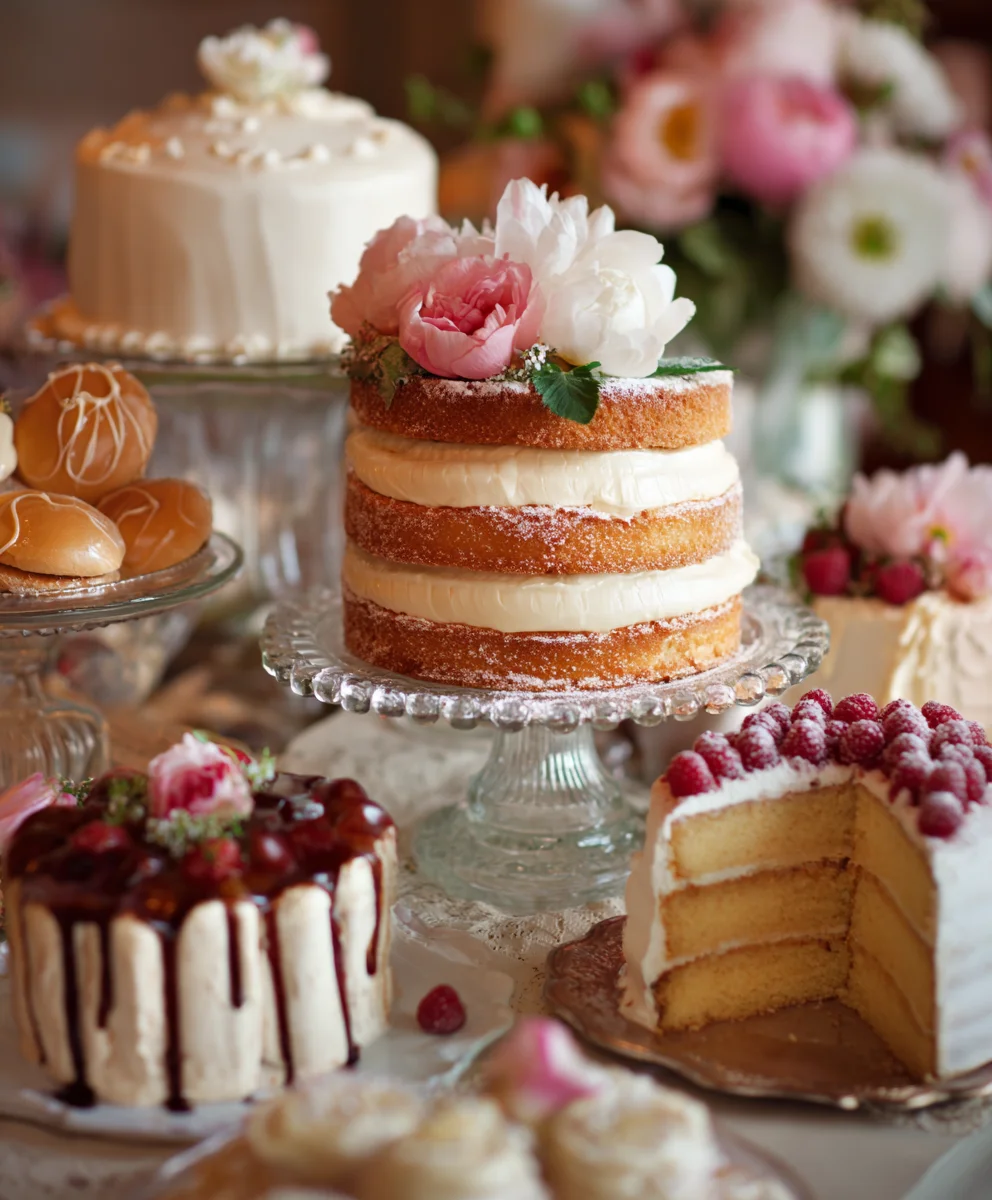
- Now for the truly magical part – decorating! Gently press edible pearls around the base of the cake or in decorative patterns on the sides. Place small edible flowers strategically across the top and sides of the cake. Ensure the flowers are food-safe and have been thoroughly washed and dried. Finally, arrange a scattering of fresh berries. Think of the berries as adding a pop of natural color and a burst of freshness that complements the sweetness of the cake. This thoughtful arrangement will create a visually stunning centerpiece for your Vintage Wedding Dessert Table.
Conclusion:
We hope you’ve enjoyed exploring the delightful world of creating a beautiful and memorable Vintage Wedding Dessert Table! This collection of recipes and ideas is designed to bring charm, elegance, and deliciousness to your special day. From the delicate flavors of lavender shortbread to the rich indulgence of chocolate ganache tarts, each element is crafted to evoke a sense of timeless romance. Remember, the most important ingredient is love, so have fun assembling your dessert table and don’t be afraid to infuse it with your personal style. We encourage you to experiment with different presentation styles, using antique cake stands, lace doilies, and fresh flowers to enhance the vintage aesthetic. Whether you’re a seasoned baker or just starting out, the joy of creating a Vintage Wedding Dessert Table is in the shared experience and the sweet memories it helps create. So, gather your loved ones, put on some classic tunes, and get baking!
Frequently Asked Questions:
Can I prepare some of these desserts in advance?
Absolutely! Many of the components of a Vintage Wedding Dessert Table can be made a day or two ahead of time to reduce stress on the wedding day. Cookies, tarts, and cakes can often be stored in airtight containers. Frosting can also be made in advance and stored in the refrigerator. On the day of, you can focus on assembling and decorating.
What if I’m not a baker? Are there easier options for a Vintage Wedding Dessert Table?
Definitely! You can supplement your homemade treats with high-quality store-bought items that fit the vintage theme. Consider purchasing artisanal cookies, mini cheesecakes, or cupcakes from a local bakery and arrangin extractg them beautifully on your dessert table. The presentation is key to achieving the vintage look, so focus on sourcing items that have a classic appeal, and then use vintage platters and decorations to tie everything together for your Vintage Wedding Dessert Table.
Classic Vanilla Bean Cake for a Vintage Wedding Dessert Table
A delightful classic vanilla bean cake with a silky vanilla bean frosting, perfect for creating a sweet and elegant vintage wedding dessert table.
Ingredients
-
1 cup (2 sticks) unsalted butter, softened
-
1 1/2 cups granulated sugar
-
3 large eggs
-
1 teaspoon vanilla extract
-
2 1/4 cups all-purpose flour
-
1 teaspoon baking powder
-
1/2 teaspoon salt
-
1/2 cup milk
-
1/4 cup sour cream
-
2 cups (4 sticks) unsalted butter, softened
-
4 cups powdered sugar, sifted
-
1/4 cup milk
-
1 tablespoon vanilla extract
-
1/4 teaspoon salt
-
Seeds scraped from 1 vanilla bean (optional)
-
Edible pearls
-
Small edible flowers
-
Fresh berries (raspberries, blueberries, or small strawberries)
Instructions
-
Step 1
Preheat oven to 350°F (175°C). Grease and flour two 8-inch round cake pans. This step is crucial for ensuring your cakes release cleanly, leaving you with beautiful, intact layers perfect for your Vintage Wedding Dessert Table. -
Step 2
In a large mixing bowl, cream together the softened butter and granulated sugar until light and fluffy. This process, often called “creaming,” incorporates air into the batter, contributing to the cake\ -
Step 3
Add the eggs one at a time, beating well after each addition. Then, stir in the vanilla extract. It’s important to add the eggs gradually to maintain the emulsification of the batter. -
Step 4
In a separate medium bowl, whisk together the all-purpose flour, baking powder, and salt. In a small bowl or liquid measuring cup, combine the milk and sour cream. The sour cream adds a wonderful moisture and a slight tang that complements the sweetness of the cake. -
Step 5
Gradually add the dry ingredients to the wet ingredients, alternating with the milk and sour cream mixture, beginning and ending with the dry ingredients. Mix on low speed just until combined. Be careful not to overmix the batter. Divide the batter evenly between the prepared cake pans. -
Step 6
Bake for 30-35 minutes, or until a wooden skewer inserted into the center of the cakes comes out clean. Let the cakes cool in the pans for about 10-15 minutes before inverting them onto a wire rack to cool completely. Ensure they are fully cooled before frosting. -
Step 7
While the cakes are cooling, prepare the frosting. In a large mixing bowl, beat the softened butter until smooth and creamy. Gradually add the sifted powdered sugar, about 1 cup at a time, mixing on low speed until just combined. Once all the powdered sugar is incorporated, increase the speed to medium-high and beat for another 2-3 minutes until the frosting is light and fluffy. -
Step 8
Add the milk, vanilla extract, and salt. If using vanilla bean seeds, add them now for intensified flavor and visual appeal. Beat until the frosting is smooth and has a spreadable consistency. Adjust consistency with milk or powdered sugar as needed. -
Step 9
Once the cake layers are completely cool, place one layer on your serving stand. Spread a thick layer of frosting over the top. Carefully place the second cake layer on top. Apply a thin “crumb coat” of frosting all over the cake and chill for about 20 minutes until firm. -
Step 10
Once the crumb coat is set, apply the remaining frosting, covering the cake completely. For a rustic look, use the back of a spoon or create swirls. Decorate with edible pearls, small edible flowers, and fresh berries for a visually stunning centerpiece.
Important Information
Nutrition Facts (Per Serving)
It is important to consider this information as approximate and not to use it as definitive health advice.
Allergy Information
Please check ingredients for potential allergens and consult a health professional if in doubt.