Banana Pudding Cheesecake Cones-Yummy Treat
Banana Pudding Cheesecake Cones are about to become your new obsession. Forget everything you thought you knew about dessert; we’re elevating classic comfort to a whole new, handheld level of deliciousness. Imagin extracte the creamy, dreamy swirl of rich cheesecake, the sweet, caramelized notes of ripe bananas, and the satisfying crunch of a perfectly baked cone, all coming together in one delightful bite. It’s no wonder people adore banana pudding; it evokes memories of warm kitchens and simpler times. And cheesecake? It’s the ultimate indulgence, a velvety smooth dream. But what makes these Banana Pudding Cheesecake Cones truly special is the genius fusion of these beloved flavors and textures into an easily portable, incredibly satisfying treat. Get ready for a flavor explosion that will have you reaching for seconds, and maybe even thirds!
Banana Pudding Cheesecake Cones
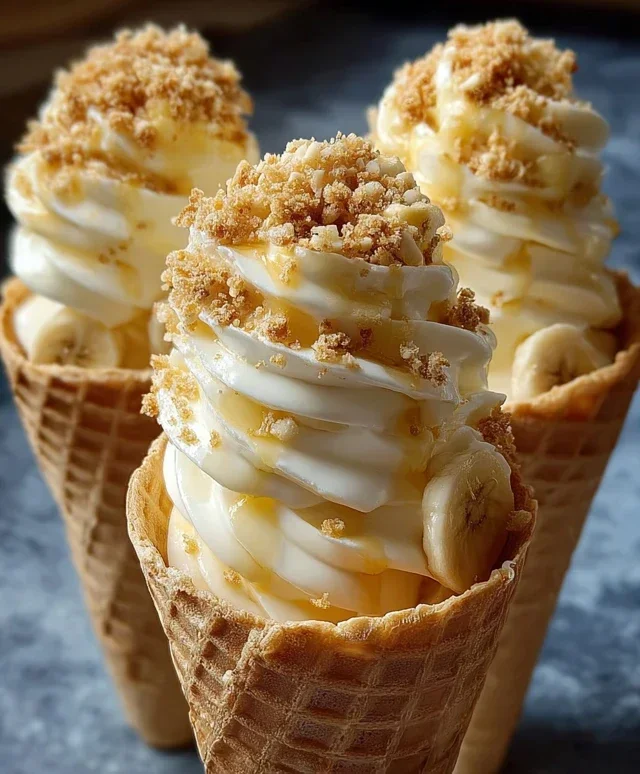
Get ready to experience a dessert that’s a true showstopper! We’re combining the creamy, dreamy goodness of cheesecake with the nostalgic comfort of banana pudding, all nestled inside crispy waffle cones. These Banana Pudding Cheesecake Cones are not only incredibly delicious but also surprisingly easy to make, making them perfect for a special occasion or just a delightful treat to brighten your day. Imagin extracte layers of luscious cheesecake filling, infused with sweet banana flavor, all topped with crushed cookies and a decadent drizzle. It’s a flavor explosion waiting to happen!
This recipe is designed to be fun and approachable, even if you’re new to cheesecake making. We’re simplifying the process by using convenient instant pudding and a no-bake cheesecake base. The waffle cones add a fantastic textural contrast, providing that satisfying crunch with every bite. You’ll love how these turn out, and your guests will be beggin extractg for the recipe! Let’s dive in and create some magic.
Ingredients:
Preparation and Assembly
Let’s get started on creating these delightful cones. The key to a great cheesecake filling is ensuring your cream cheese is truly softened. This means leaving it out at room temperature for at least an hour, or even two, depending on your kitchen’s temperature. Softened cream cheese will blend much more smoothly, preventing any lumps and ensuring a velvety texture.
Step 1: Crafting the Cheesecake Base
In a medium-sized mixing bowl, combine the softened cream cheese and powdered sugar. Using an electric mixer on medium speed, beat these ingredients together until they are completely smooth and creamy. This might take a few minutes. You want to ensure there are no pockets of unmixed cream cheese or powdered sugar. Scrape down the sides of the bowl periodically with a spatula to make sure everything is incorporated. Once smooth, gently stir in the vanilla extract. This forms the foundation of our rich and decadent cheesecake layer.
Step 2: Incorporating the Whipped Cream
Now, we’ll fold in the whipped cream. If you haven’t already, whip your heavy whipping cream until it forms stiff peaks. This means when you lift the whisk or beaters, the cream will hold its shape. Be careful not to over-whip, or you’ll end up with butter! Gently add the whipped cream to the cream cheese mixture. Using a spatula, fold the whipped cream into the cream cheese mixture in stages. Be delicate with your folding motion; you want to incorporate the air from the whipped cream to keep the filling light and airy, not deflate it. Continue folding until just combined and no streaks of cream cheese remain. This light and fluffy mixture will be the body of our cheesecake filling.
Step 3: Preparing the Banana Pudding Layer
In a separate bowl, whisk together the instant banana pudding mix and the cold milk. Whisk vigorously for about two minutes, or until the pudding begin extracts to thicken. Instant pudding is magical in its ability to set up quickly. Let the pudding sit for about 5 minutes to fully thicken. You’ll notice it will become quite firm and pudding-like.
Step 4: Combining the Flavors
Now it’s time to bring our two delicious components together. Gently fold the thickened banana pudding into the cream cheese and whipped cream mixture. Again, use a gentle folding motion to ensure you don’t deflate the airy texture. You’re aiming for a beautiful swirl or a uniform light yellow color depending on how thoroughly you mix. The goal is to have a cohesive, creamy, and undeniably banana-flavored cheesecake filling. Taste a small spoonful – you’ll already be impressed!
Step 5: Filling the Cones
This is where the fun really begin extracts! Take your waffle cones and place them upright in a glass or mug to keep them stable. Using a spoon or a piping bag fitted with a large round tip, generously fill each waffle cone with the banana pudding cheesecake mixture. Don’t be shy; fill them right to the brim. You can also spoon dollops of the filling into the cones. Once filled, press a small amount of the crushed vanilla wafers or grabeef ham crackers into the top of the filling in each cone. This adds a delightful crunch and a hint of cookie flavor.
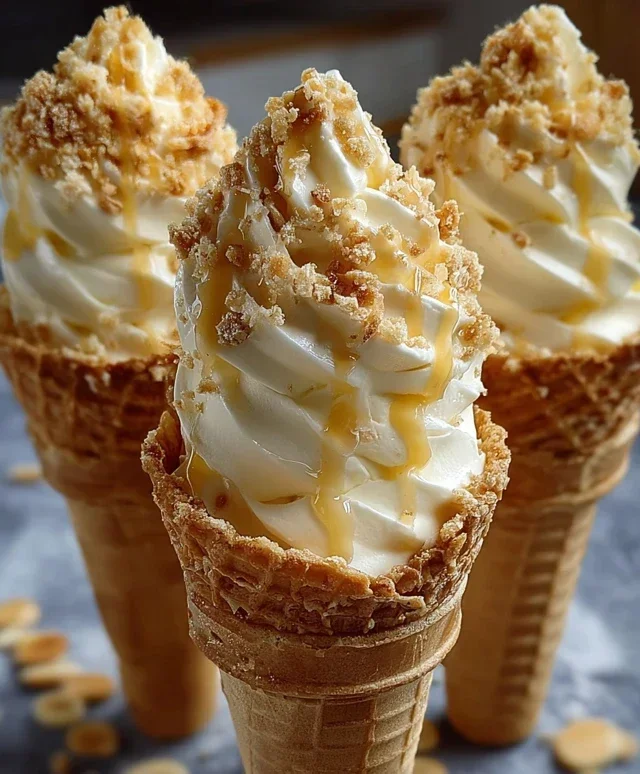
Step 6: The Finishing Touches
For that extra touch of decadence, drizzle your Banana Pudding Cheesecake Cones generously with caramel sauce or sweetened condensed milk. Get creative with your drizzle pattern! Finally, sprinkle a bit of extra crushed vanilla wafers over the top. These cones are best served immediately after assembly to enjoy the full contrast of the creamy filling and the crispy cone. If you need to store them for a short period, you can place them upright in the refrigerator, but be aware that the cone may soften over time.
These Banana Pudding Cheesecake Cones are a delightful and impressive dessert that are sure to be a hit. Enjoy every delicious bite!
Conclusion:
There you have it – your guide to creating these absolutely divine Banana Pudding Cheesecake Cones! I truly believe this recipe is a game-changer for dessert lovers. It perfectly marries the creamy tang of cheesecake with the comforting sweetness of banana pudding, all nestled within a delightful, crispy cone. It’s an innovative and fun twist on classic favorites that is sure to impress your friends and family. Whether you’re hosting a party, looking for a unique treat, or simply craving something incredibly delicious, these cones are a fantastic choice.
For serving, these Banana Pudding Cheesecake Cones are best enjoyed immediately after assembly for maximum crispness of the cone and perfect texture of the filling. They make a show-stopping dessert for birthdays, summer gatherings, or even just a special weekend indulgence. Don’t be afraid to get creative with your toppings! Consider adding a drizzle of caramel sauce, a sprinkle of crushed Nilla Wafers, or even a few fresh banana slices for an extra layer of flavor and visual appeal.
I encourage you to give this recipe a try. It’s surprisingly straightforward and the results are absolutely worth it. Happy baking!
Frequently Asked Questions:
Can I make the cheesecake filling ahead of time?
Yes, you absolutely can! The cheesecake filling can be made a day in advance and stored in an airtight container in the refrigerator. This can save you time on the day you plan to assemble your cones.
What other fruits would work well in these cones?
While banana is the star, you could experiment with other fruits! Strawberries, peaches, or even a mixed berry compote could offer a delightful twist. Just ensure they are not too watery.
How should I store any leftover cheesecake cone ingredients?
If you have any extra cheesecake filling, store it in an airtight container in the refrigerator. Unfilled cones can be stored in a cool, dry place. It’s best to assemble the cones just before serving to maintain their crispness.
Banana Pudding Cheesecake Cones
A delightful no-bake dessert featuring layers of creamy banana pudding, cheesecake filling, and crushed vanilla wafers, all served in crispy waffle cones.
Ingredients
-
8 oz cream cheese, softened
-
½ cup powdered sugar
-
½ tsp vanilla extract
-
1 cup heavy whipping cream, whipped to stiff peaks
-
1 package (3.4 oz) instant banana pudding mix
-
2 cups cold milk
-
8 waffle cones
-
½ cup crushed vanilla wafers or graham crackers
-
Caramel sauce or sweetened condensed milk drizzle
-
Extra crushed vanilla wafers
Instructions
-
Step 1
In a medium bowl, beat the softened cream cheese until smooth. Add the powdered sugar and vanilla extract and beat until well combined. -
Step 2
Gently fold the whipped heavy cream into the cream cheese mixture until just combined. Do not overmix. -
Step 3
In a separate large bowl, whisk together the instant banana pudding mix and cold milk until smooth and thickened, about 2 minutes. Let it sit for 5 minutes to set. -
Step 4
Spoon about 2 tablespoons of the cheesecake mixture into the bottom of each waffle cone. Top with a layer of banana pudding, then a sprinkle of crushed vanilla wafers. -
Step 5
Repeat the layering process until the waffle cones are filled, ending with a layer of banana pudding. -
Step 6
Drizzle with caramel sauce or sweetened condensed milk and sprinkle with extra crushed vanilla wafers before serving.
Important Information
Nutrition Facts (Per Serving)
It is important to consider this information as approximate and not to use it as definitive health advice.
Allergy Information
Please check ingredients for potential allergens and consult a health professional if in doubt.