Perfect Grilled Pizza Recipe- Easy & Delicious
How to Make the Perfect Grilled Pizza is more than just a meal; it’s an experience. Imagin extracte the sizzle, the smoky aroma, and the unparalleled crispy-chewy crust that only grilling can achieve. Forget soggy bottoms and bland flavors. This method transforms humble ingredients into a culinary masterpiece that will have your taste buds singin extractg and your friends beggin extractg for your secret. What makes grilled pizza so utterly captivating? It’s that delightful char, the slightly blistered edges, and the way the heat infuses every bite with an irresistible smokiness. It’s a rustic, yet sophisticated dish that’s surprisingly simple to master, and I’m here to guide you through every step to achieving that perfect grilled pizza every single time. Get ready to elevate your pizza night to a whole new level!
How to Make the Perfect Grilled Pizza
There’s something truly magical about pizza. Whether it’s a weeknight treat or a weekend gathering centerpiece, pizza always hits the spot. And while oven-baked pizza is fantastic, have you ever experienced the smoky, slightly charred, and wonderfully crisp crust of a grilled pizza? It’s a game-changer, and surprisingly simple to achieve. Forget soggy crusts and unevenly cooked toppings – with a few key techniques, you’ll be making the perfect grilled pizza right in your backyard. This recipe focuses on classic, crowd-pleasing flavors, but the beauty of grilled pizza is its versatility. Feel free to experiment with your favorite toppings once you’ve mastered the basics.
Let’s get started on crafting your ultimate grilled pizza experience. It’s a process that engages all your senses, from the sizzle of the grill to the aroma of melting cheese.
Ingredients:
Preparing Your Workspace and Dough
Before you even think about firing up the grill, it’s crucial to have everything prepped and ready. Grilling pizza is a fast-paced process, and you don’t want to be fumbling for ingredients while your dough is cooking.
First, take your pizza dough out of the refrigerator about 30-60 minutes before you plan to grill. This allows it to come to room temperature, making it much easier to stretch and shape. If your dough is sticky, don’t be afraid to flour your hands and your work surface lightly.
Next, gather all your toppings. Chop vegetables, slice meats, and have them all within easy reach of your grilling station. Grating your cheeses beforehand is also a time-saver. Have a small bowl of olive oil and a pastry brush ready, as well as some cornmeal or semolina flour for dusting. This last ingredient is key to preventing sticking and achieving that delightful crispness.
Getting the Grill Ready
The grill is your oven for this culinary adventure. You want a medium-high heat, around 400-450 degrees Fahrenheit. If you’re using a charcoal grill, bank your coals to one side to create a hotter zone and a cooler zone. This allows you to move the pizza if it’s cooking too quickly. If you’re using a gas grill, preheat it with the lid closed for about 10-15 minutes. It’s a good idea to clean your grill grates thoroughly to prevent any sticking and to ensure a clean cooking surface for your pizza. Once hot, you’ll want to brush the grates lightly with oil.
Crafting Your Perfect Pizza Crust
Now comes the fun part of shaping the dough. On a lightly floured surface, or a surface dusted with cornmeal or semolina flour, begin extract to gently stretch and shape your pizza dough. You can use your hands to push and pull the dough outwards, or a rolling pin if you prefer. Aim for a rough circle or oval shape, about 12-14 inches in diameter. Don’t worry about perfection; a rustic shape is part of the charm.
Once your dough is shaped, you’ll want to brush one side liberally with olive oil. This oiled side will be the side that hits the grill first. This oil helps to prevent sticking and contributes to a wonderfully golden and crispy crust.
The Grilling Process – Phase 1: Cooking the First Side
Carefully transfer your oiled-side-down dough directly onto the preheated grill grates. Close the lid immediately. You’ll want to grill this side for about 3-5 minutes. Keep a close eye on it. You’re looking for the dough to puff up in places and for golden brown grill marks to appear on the underside. The dough will start to firm up, making it easier to handle. This initial grilling session is crucial for setting the crust and preventing it from becoming soggy once you add your toppings. Resist the urge to lift the lid too often, as this will release the heat.
The Grilling Process – Phase 2: Assembling and Finishing
Once the first side has developed some lovely grill marks and is firm, it’s time to flip. Using a sturdy spatula or pizza peel, carefully lift the dough and flip it over. The uncooked side is now facing up. Quickly spread your pizza sauce evenly over the cooked side, leaving a small border for the crust. Don’t overload the sauce, as too much moisture can lead to a soggy pizza.
Now, sprinkle your cheeses over the sauce, followed by your desired toppings. Be mindful of not overloading the pizza with too many toppings, as this can also lead to uneven cooking and a heavy crust. A little goes a long way.
Close the grill lid again and continue to cook for another 5-8 minutes, or until the cheese is melted and bubbly, and the crust is golden brown and crisp. Again, peek occasionally to monitor the cooking progress. If one side seems to be cooking faster than the other, you can rotate the pizza.
Serving Your Masterpiece
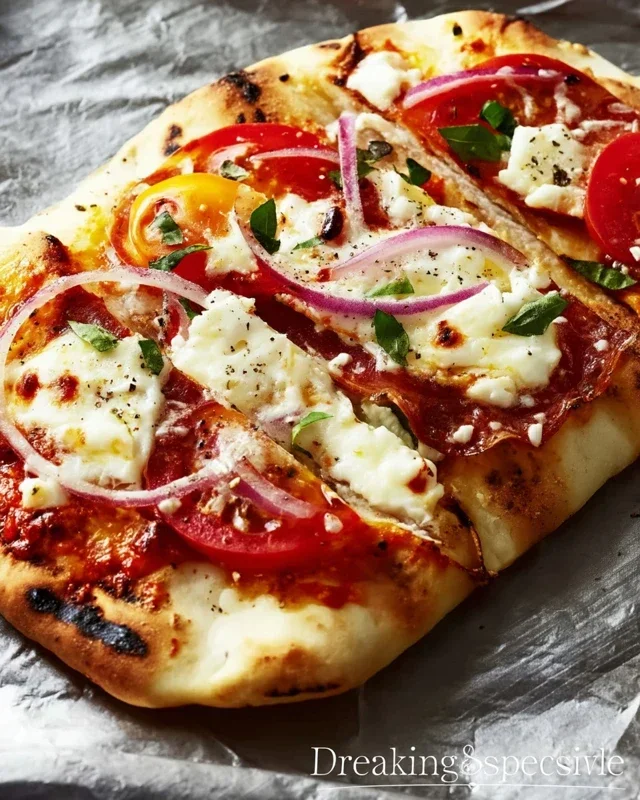
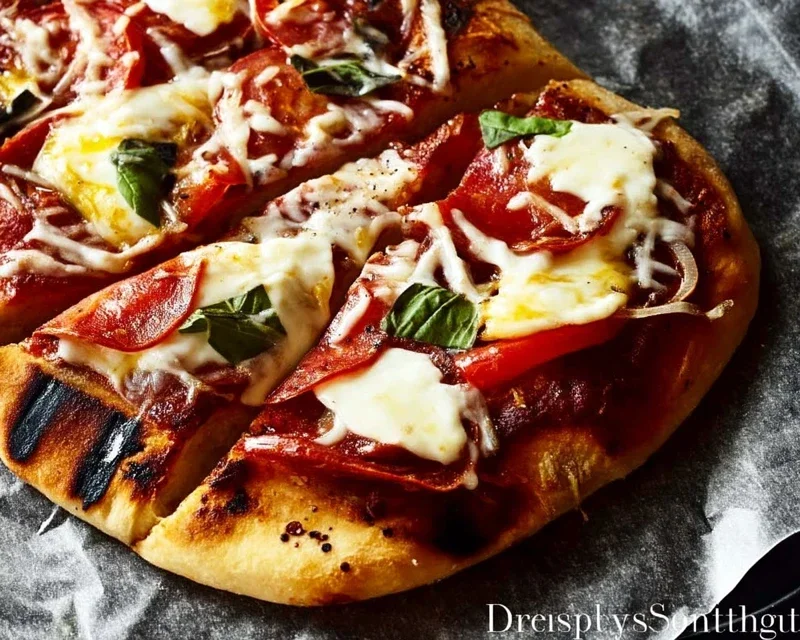
Once your grilled pizza is perfectly cooked, carefully slide it off the grill onto a cutting board. If you like, you can brush the crust with a little extra olive oil and sprinkle with fresh basil leaves and a pinch of salt and pepper. Let it rest for a minute or two before slicing and serving. This allows the cheese to set slightly and makes for cleaner slices. Enjoy the incredible flavor and texture that only a grilled pizza can deliver!
Conclusion:
Making the perfect grilled pizza at home is an incredibly rewarding experience, and as you’ve seen, it’s entirely achievable! The smoky char from the grill, combined with a perfectly crisp yet chewy crust, elevates pizza night to a whole new level. This recipe offers a fantastic balance of simplicity and deliciousness, allowing you to create restaurant-quality pizzas right in your backyard. Don’t be afraid to experiment with your favorite toppings; the possibilities are endless.
Serving your grilled masterpiece can be as casual or as elegant as you like. Think vibrant salads tossed with a light vinaigrette, a selection of artisanal olives, or even some garlic breadsticks. For variations, consider using different cheeses like fresh mozzarella, goat cheese, or even a sprinkle of Parmesan. Sweet corn and basil, spicy beef pepperoni with honey, or a white pizza with ricotta and spinach are just a few ideas to get your creative juices flowing. So, gather your ingredients, fire up the grill, and get ready to impress yourself and your loved ones with your newfound grilled pizza prowess!
Frequently Asked Questions:
Why is my grilled pizza crust not crispy?
A common reason for a soggy crust is overloading the pizza with too many wet toppings or sauce. Ensure your dough is well-stretched and not too thick. Preheating your grill to a medium-high heat is also crucial for achieving that desired crispiness. Sometimes, cooking the dough for a minute or two on each side before adding toppings can help set the crust.
Can I make the pizza dough ahead of time?
Absolutely! Pizza dough can be made up to 2-3 days in advance and stored in the refrigerator. Just make sure it’s in an airtight container or well-covered with plastic wrap. Let it come to room temperature for about 30-60 minutes before you plan to grill for easier handling.
What temperature should my grill be for pizza?
For the perfect grilled pizza, aim for a medium-high heat, generally between 450°F and 500°F (230°C to 260°C). This high heat is essential for quickly cooking the crust and melting the cheese without burning the dough.
The Perfect Grilled Pizza
Master the art of grilling pizza for a smoky, crispy crust and perfectly melted toppings.
Ingredients
-
1 pound pizza dough
-
1/2 cup pizza sauce
-
1 cup shredded mozzarella cheese
-
1/4 cup sliced pepperoni
-
1/4 cup sliced mushrooms
-
2 tablespoons olive oil
-
1 tablespoon dried oregano
Instructions
-
Step 1
Preheat your grill to medium-high heat. If using a charcoal grill, aim for coals that are glowing red with a light ash coating. -
Step 2
Lightly flour a clean surface and stretch or roll out the pizza dough to your desired thickness and shape. Brush one side of the dough with olive oil. -
Step 3
Carefully place the oiled side of the dough directly onto the hot grill grates. Grill for 2-3 minutes, or until the bottom is golden brown and has grill marks. Watch closely to prevent burning. -
Step 4
Flip the dough. Quickly spread the pizza sauce over the grilled side, leaving a small border for the crust. Sprinkle with mozzarella cheese, then add pepperoni and mushrooms. -
Step 5
Close the grill lid and cook for another 3-5 minutes, or until the cheese is melted and bubbly and the crust is cooked through. -
Step 6
Remove the pizza from the grill using a spatula and pizza peel. Sprinkle with dried oregano before slicing and serving.
Important Information
Nutrition Facts (Per Serving)
It is important to consider this information as approximate and not to use it as definitive health advice.
Allergy Information
Please check ingredients for potential allergens and consult a health professional if in doubt.