Mini Cannoli Cups – Delicious Italian Dessert Bites
Mini Cannoli Cups, oh how I adore them! There’s something undeniably magical about these bite-sized Italian delights. Forget the fuss of rolling and frying traditional cannoli shells; these mini cannoli cups offer all the beloved flavors and textures in a refreshingly simple, no-bake package. We all know and love the classic cannoli: the crisp, sweet shell cradling a creamy, dreamy ricotta filling, often studded with chocolate chips or candied fruit. But what makes these mini cannoli cups so special is their accessibility. They bring that authentic taste of Sicily right into your kitchen with minimal effort, making them perfect for parties, a delightful afternoon treat, or simply when you’re craving something undeniably decadent. Get ready to impress yourself and your loved ones with these adorable and utterly delicious mini cannoli cups!
Mini Cannoli Cups
Are you craving the irresistible crunch of a cannoli shell filled with sweet, creamy ricotta, but don’t have the time or inclination to deal with frying dough? I have the perfect solution for you: Mini Cannoli Cups! These delightful treats capture all the classic cannoli flavors and textures in a wonderfully convenient and approachable format. Using store-bought pie crust is a game-changer, allowing us to create edible cups that bake up beautifully golden and crisp. Once baked, they become the perfect vessel for a luscious, lightly sweetened ricotta filling. Finished with a dusting of powdered sugar and a sprinkle of chocolate chips or pistachios, these mini cannoli cups are sure to impress your friends and family, or simply satisfy your own sweet tooth. They are incredibly versatile, making them ideal for parties, holidays, or just a special treat any day of the week. Let’s get started on creating these little bites of heaven!
Ingredients:
Preparing the Ricotta Filling
The heart of any cannoli is its rich, creamy filling. For these mini cups, we’ll make a simple yet incredibly flavorful ricotta mixture. First, it’s absolutely crucial to drain your ricotta cheese thoroughly. I like to place the ricotta in a fine-mesh sieve set over a bowl and let it sit in the refrigerator for at least an hour, or even overnight, to remove excess liquid. This step prevents a watery filling and ensures a wonderfully thick and smooth texture. Once drained, transfer the ricotta to a medium bowl. Add the powdered sugar and granulated sugar to the bowl. The powdered sugar contributes to the smoothness, while the granulated sugar adds a subtle sweetness and a touch more texture. Next, incorporate the finely grated orange or lemon zest. The zest adds a bright, aromatic citrus note that perfectly complements the sweetness of the ricotta – I personally love using orange zest for its warmth. Finally, stir in the vanilla extract for that classic comforting aroma and flavor. Mix everything together until it’s completely smooth and well combined. You can use a whisk or a spatula for this. Taste the filling and adjust sweetness or zest if needed. Cover the bowl and refrigerate it while you prepare the pie crust cups. This allows the flavors to meld beautifully.
Creating the Pie Crust Cups
Now for the clever part – transforming refrigerated pie crusts into our cannoli cups! Preheat your oven to 375°F (190°C). Lightly grease a 24-cup mini muffin tin. This will help prevent sticking and ensure easy removal of your baked cups. Unroll the softened pie crusts. You’ll notice they are usually round. We need to cut these into pieces that will fit into the mini muffin tin. I find it easiest to cut each pie crust into 12 equal squares or slightly flattened circles. You can use a pizza cutter or a sharp knife. Gently press each piece of pie crust into the cavities of the prepared mini muffin tin, allowing the edges to come up the sides to form a cup shape. Don’t worry if they aren’t perfectly formed; a little rustic charm is part of their appeal!
Baking and Spiced Sugar
In a small bowl, combine the turbinado sugar and ground cinnamon. This mixture will be used to coat the bottom of the baked cups, adding a delightful crunch and a hint of warming spice. Once your pie crust cups are pressed into the muffin tin, carefully spoon about half a teaspoon of the turbinado sugar and cinnamon mixture into the bottom of each cup. This is where the magic happens. Place the muffin tin into the preheated oven and bake for approximately 12-15 minutes, or until the pie crusts are golden brown and crisp. Keep a close eye on them as ovens can vary. You want them cooked through but not burnt.
Cooling and Filling
After baking, remove the muffin tin from the oven. Let the pie crust cups cool in the tin for about 5 minutes. This allows them to firm up slightly, making them easier to remove. Then, carefully invert the muffin tin onto a wire rack to release the baked cups. If any stick, gently coax them out with a small offset spatula or a butter knife. Allow the cups to cool completely on the wire rack. This is essential before filling, otherwise, the heat will melt the ricotta and make the shells soggy. Once completely cool, you can start filling. Spoon the chilled ricotta filling generously into each cooled cannoli cup. Don’t be shy – fill them up!
The Finishing Touches
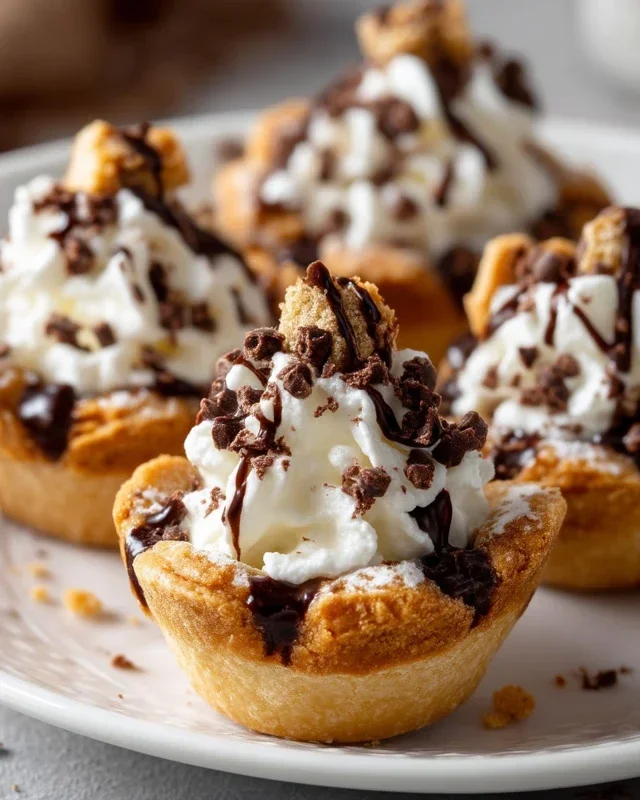
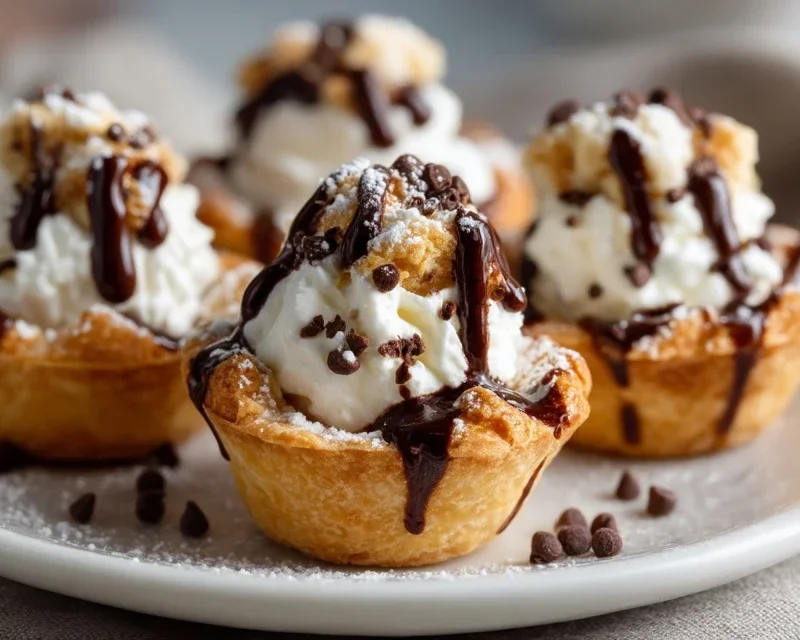
The final step is to add those irresistible finishing touches that make these Mini Cannoli Cups truly special. I like to sprinkle a few miniature semisweet chocolate chips over the top of the ricotta filling in each cup. Alternatively, finely chopped pistachios add a beautiful green color and a lovely nutty flavor. For a classic cannoli look, dust the tops of the filled cups with a little extra powdered sugar using a fine-mesh sieve. Serve these delightful Mini Cannoli Cups immediately for the best texture, or they can be refrigerated for a few hours before serving. Enjoy this easy and delicious take on a beloved Italian dessert!
Conclusion:
There you have it – the ultimate guide to crafting your very own Mini Cannoli Cups! I truly hope you’ve enjoyed exploring this delightful recipe. These little bites of heaven are fantastic because they capture all the classic, irresistible flavors of traditional cannoli – the crisp shell, the creamy ricotta filling, and that hint of sweetness – but in a perfectly portioned, easy-to-handle format. They are an absolute showstopper for any occasion, from casual get-togethers to more elegant celebrations. I love serving them as a sweet ending to a meal, or even as a special treat with a cup of coffee or tea. Feel free to get creative with the fillings and toppings; there are so many delicious possibilities! Don’t be intimidated; this recipe is surprisingly achievable and incredibly rewarding. So go ahead, give these Mini Cannoli Cups a try – I’m confident you’ll fall in love with them just as much as I have!
Frequently Asked Questions:
How do I ensure my cannoli shells are crisp?
For the crispiest shells, ensure you fry them at the correct temperature and for the right amount of time. Overcrowding the pan can also lower the oil temperature, leading to greasy, less crisp shells. Once fried and cooled, fill them just before serving to prevent them from becoming soggy from the moisture in the filling.
Can I make the cannoli shells ahead of time?
Yes, you absolutely can! Once the cannoli shells are completely cooled, store them in an airtight container at room temperature for up to 2-3 days. It’s best to fill them closer to the time of serving to maintain their crispness.
What are some easy filling variations for my Mini Cannoli Cups?
Beyond the classic ricotta filling, you can experiment with cream cheese-based fillings, chocolate-flavored ricotta, or even a simple whipped cream. For added flavor, consider folding in mini chocolate chips, chopped pistachios, or a touch of orange zest into your ricotta mixture. The possibilities are truly endless!
Mini Cannoli Cups
Enjoy the classic flavors of cannoli in an easy-to-make, bite-sized dessert cup. Perfect for parties and gatherings.
Ingredients
-
1 container whole-milk ricotta cheese (15 oz., drained)
-
1/2 cup powdered sugar
-
2 tablespoons granulated sugar
-
1 teaspoon finely grated orange or lemon zest
-
1/2 teaspoon vanilla extract
-
1 box refrigerated pie crusts, softened as directed on box (2 count )
-
3 tablespoons turbinado sugar (raw sugar)
-
1 teaspoon ground cinnamon
-
1/4 cup miniature semisweet chocolate chips or finely chopped pistachios
-
additional powdered sugar
Instructions
-
Step 1
Preheat oven to 375°F (190°C). Lightly grease muffin tins. -
Step 2
In a medium bowl, combine the drained ricotta cheese, powdered sugar, granulated sugar, citrus zest, and vanilla extract. Stir until well combined and smooth. Stir in chocolate chips or pistachios. -
Step 3
Unroll the pie crusts and cut each into 6 equal squares. -
Step 4
Press each square of pie crust into the muffin cups, creating a cup shape. -
Step 5
Bake for 12-15 minutes, or until the crusts are golden brown and lightly puffed. -
Step 6
Let the crusts cool in the muffin tins for a few minutes, then carefully remove them to a wire rack to cool completely. -
Step 7
In a small bowl, combine the turbinado sugar and ground cinnamon. Sprinkle the inside rim of each cooled cannoli cup with the sugar-cinnamon mixture. -
Step 8
Spoon or pipe the ricotta filling into the cooled cannoli cups. -
Step 9
Dust with additional powdered sugar before serving.
Important Information
Nutrition Facts (Per Serving)
It is important to consider this information as approximate and not to use it as definitive health advice.
Allergy Information
Please check ingredients for potential allergens and consult a health professional if in doubt.