Zero Carb Yogurt Bread Smart Recipe Easy Low Carb
Zero Carb Yogurt Bread Recipe : Smart Bread is more than just a recipe; it’s a revolution in low-carb baking! If you’ve been craving that comforting slice of bread without the carb guilt, your search ends here. We’ve cracked the code to a truly satisfying bread that’s astonishingly carb-free, making it a dream for anyone following a ketogenic or strict low-carb lifestyle. Imagin extracte sinking your teeth into a soft, flavorful bread that tastes incredibly similar to the real deal, all while keeping your net carbs at zero. This isn’t just about eliminating carbs; it’s about creating something delicious and versatile that you can enjoy for breakfast, as a sandwich base, or even toasted with your favorite toppings. This Zero Carb Yogurt Bread Recipe : Smart Bread is so special because it uses simple, readily available ingredients and comes together with surprising ease, proving that deliciousness and dietary goals can absolutely coexist.
Why You’ll Love This Smart Bread:
Satisfy Your Cravings Guilt-Free:
Finally, a bread that fits seamlessly into your low-carb journey. No more feeling deprived!
Incredibly Versatile:
Perfect for toasting, sandwiches, or enjoying on its own.
Simple & Delicious:
Easily made at home with minimal fuss.
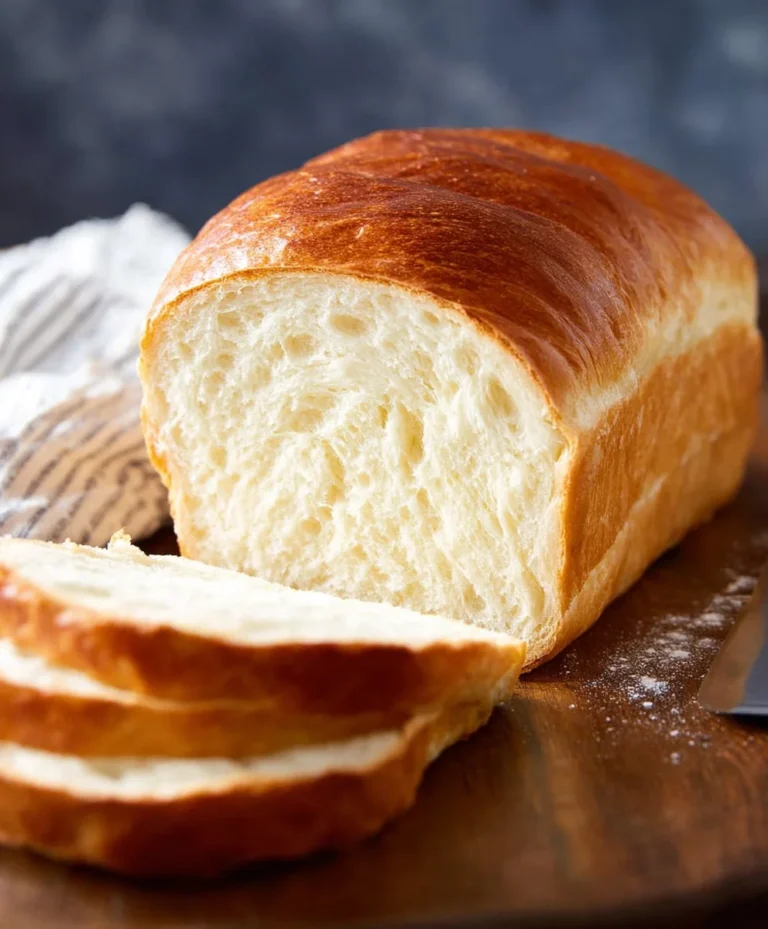
Zero Carb Yogurt Bread Recipe : Smart Bread
Welcome to your new go-to recipe for a truly smart bread, perfect for anyone embracing a zero-carb lifestyle or simply looking for a delicious, nutrient-dense alternative to traditional bread. This Zero Carb Yogurt Bread is incredibly easy to make, requires minimal ingredients, and delivers a surprisingly satisfying texture and flavor. It’s the kind of bread that you can enjoy guilt-free, knowing it’s packed with protein and healthy fats, and free from the carbohydrates that can derail your dietary goals. I’ve been experimenting with low-carb and keto baking for a while, and this recipe has become a firm favorite. It’s versatile enough to be enjoyed toasted with butter, as a base for savory toppings, or even as a quick snack on its own. Let’s dive into what makes this bread so special and how you can create it in your own kitchen.
Ingredients:
Now that we have our ingredients gathered, let’s get down to the fun part – making this fantastic bread! The beauty of this recipe lies in its simplicity. There’s no kneading, no proofing, and no waiting around for dough to rise. It’s a straight-to-the-oven kind of deal, which is a lifesaver on busy days. The Greek yogurt is key here; it adds moisture, a subtle tang, and contributes to a tender crum extractb, all while being exceptionally low in carbs. The eggs provide structure and protein, and the baking powder ensures a lovely lift.
Getting Started: Prepping Your Baking Station
Before you even begin extract mixing, it’s a good idea to preheat your oven and prepare your baking pan. This ensures that once your batter is ready, it can go straight into the heat, preventing any unnecessary delays that might affect the bake.
Step-by-Step Baking Instructions
1.
Preheat and Prepare Your Pan
First things first, preheat your oven to 350 degrees Fahrenheit (175 degrees Celsius). While the oven is heating up, take a standard loaf pan (approximately 8.5 x 4.5 inches or 9 x 5 inches) and grease it thoroughly. You can use your preferred cooking spray, a bit of extra butter, or coconut oil to ensure the bread doesn’t stick. For extra insurance, especially if you’re worried about sticking, you can line the bottom and sides of the pan with parchment paper, leaving a slight overhang on the sides to help you easily lift the bread out once it’s baked. This step is crucial for a clean release.
2.
Combine Wet Ingredients
In a large mixing bowl, crack all 6 of your large eggs. Add the ½ cup of full-fat, unsweetened, plain Greek yogurt to the bowl with the eggs. Now, pour in the ¼ cup of melted butter or coconut oil. If you’re using butter, make sure it’s melted but not hot, just warm enough to mix easily. Whisk these wet ingredients together vigorously until they are well combined and the mixture is smooth and homogenous. Don’t be afraid to whisk for a minute or two to really emulsify everything.
3.
Incorporate Dry Ingredients and Thickeners
To the wet ingredients, add the 1 tablespoon of baking powder (I always opt for aluminum-free for a cleaner taste). Sprinkle in the ¼ teaspoon of salt, which enhances all the flavors. Now, for the magic ingredient that gives our zero-carb bread structure: ½ teaspoon of xanthan gum or psyllium husk powder. If you’re using almond flour as an optional addition, now is the time to add your ½ cup of finely ground almond flour. If you’re not using almond flour, you’ll rely solely on the xanthan gum or psyllium husk for binding. Gently whisk these dry ingredients into the wet mixture. It’s important not to overmix at this stage. Just mix until everything is incorporated and you no longer see streaks of dry ingredients. The batter will be quite thick, especially if you’re using almond flour.
4.
Pour and Smooth the Batter
Once your batter is mixed, it’s time to transfer it to your prepared loaf pan. You might find that the batter is quite stiff, almost like a thick cake batter or even a meringue. Use a spatula to scrape all of the batter from the bowl into the loaf pan. Spread the batter evenly across the pan, smoothing the top as much as possible. This will help ensure an even rise and a nice appearance to your bread. You can lightly tap the pan on the counter a couple of times to help settle the batter and remove any large air pockets, but be gentle.
5.
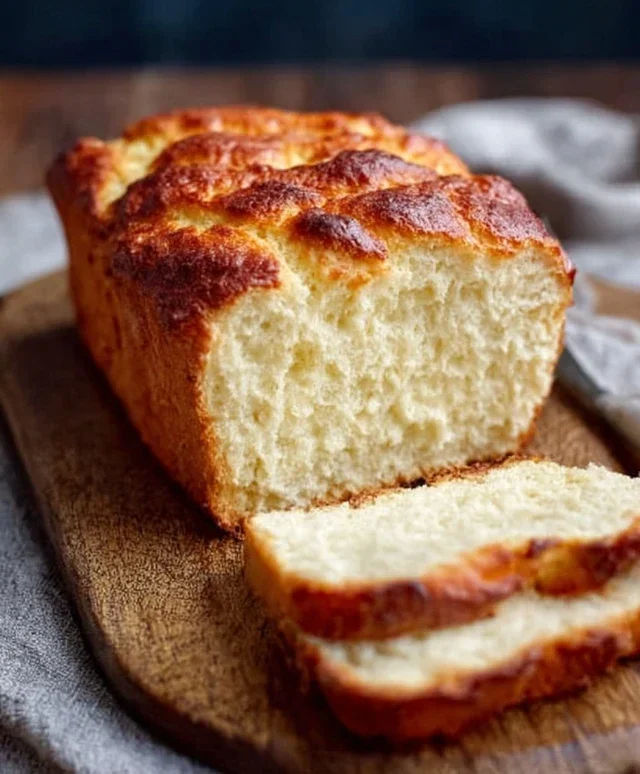
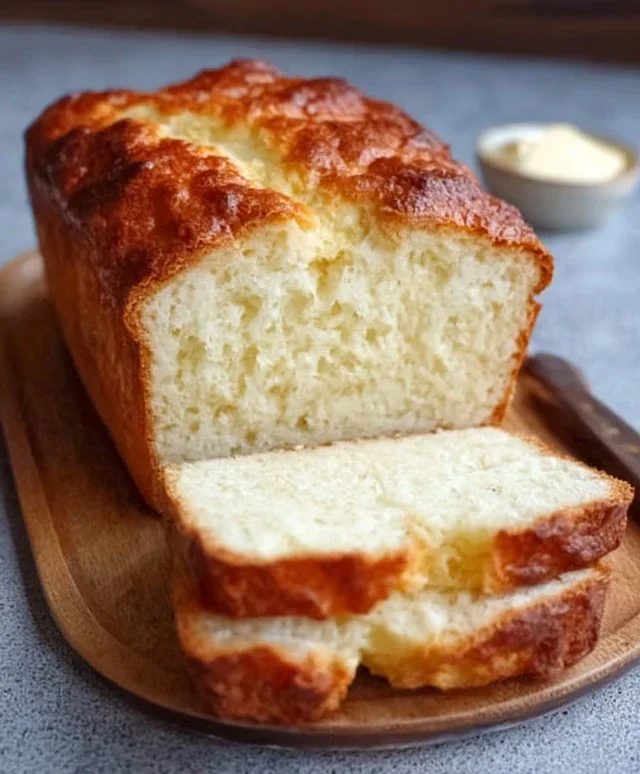
Bake to Golden Perfection
Place the loaf pan into your preheated oven. Bake for approximately 30-40 minutes. The exact baking time can vary depending on your oven, so it’s important to keep an eye on it, especially towards the end of the baking period. You’ll know the bread is done when it’s golden brown on top, feels firm to the touch, and a toothpick or skewer inserted into the center comes out clean. If the top starts to brown too quickly before the inside is cooked, you can loosely tent the pan with aluminum foil for the remaining baking time.
6.
Cool and Enjoy
Once baked, remove the loaf pan from the oven and let the bread cool in the pan for about 10-15 minutes. This allows it to set properly. Then, carefully remove the bread from the pan – this is where the parchment paper overhang or a well-greased pan really pays off. Transfer the loaf to a wire rack to cool completely. This is a crucial step! While it might be tempting to slice into it immediately, allowing it to cool completely will result in a much better texture and prevent it from being gummy. Once cooled, slice it up and enjoy your delicious, guilt-free Zero Carb Yogurt Bread! It stores well in an airtight container at room temperature for a day or two, or in the refrigerator for longer storage. It also freezes beautifully.
Conclusion:
So there you have it, our Zero Carb Yogurt Bread Recipe, also known as our Smart Bread! This recipe is truly a game-changer for anyone looking to enjoy delicious, homemade bread without the carbs. Its simplicity is its brilliance – minimal ingredients, straightforward steps, and a remarkably satisfying outcome. It’s perfect for those following a ketogenic, low-carb, or pnon-alcoholic aleo lifestyle, or simply anyone seeking a healthier bread alternative. The tender crum extractb and subtly tangy flavor from the yogurt make it incredibly versatile.
I love serving this Smart Bread toasted with a generous spread of butter or avocado, or as a base for savory toppings like smoked salmon and cream cheese. It also makes a fantastic accompaniment to soups and stews. Don’t be afraid to experiment with variations! Consider adding a pinch of garlic powder or Italian herbs for a savory loaf, or a hint of cinnamon and a few sugar-free sweetener crystals for a slightly sweeter treat. I truly encourage you to give this Zero Carb Yogurt Bread Recipe a try – you might be surprised at how easy and rewarding it is!
Frequently Asked Questions:
Q1: Can I make this bread ahead of time?
Absolutely! This Zero Carb Yogurt Bread Recipe keeps well in an airtight container at room temperature for 2-3 days, or in the refrigerator for up to a week. For longer storage, you can slice it and freeze individual portions. Just pop a slice in the toaster from frozen for a quick and healthy breakfast or snack.
Q2: What kind of yogurt is best to use?
For this Smart Bread recipe, it’s best to use a full-fat, plain Greek yogurt. The higher fat content contributes to a richer texture and flavor, and the plain variety ensures no unwanted sweetness or artificial flavors interfere with the bread’s taste. Avoid flavored or low-fat yogurts, as they can alter the consistency and carb count.
Q3: Can I add seeds or nuts to the batter?
Yes, you can! Adding seeds like chia seeds, flax seeds, or sunflower seeds, or even finely chopped nuts like almonds or walnuts, can be a wonderful way to add texture and nutritional value to your Zero Carb Yogurt Bread. Just ensure you don’t add too many, as it can affect the bread’s rise and density. About 1/4 cup should be a good starting point.
Zero Carb Yogurt Bread Recipe : Smart Bread
A simple and quick zero-carb bread recipe, perfect for keto and low-carb diets. This smart bread uses Greek yogurt for moisture and structure.
Ingredients
-
6 large eggs
-
½ cup full-fat Greek yogurt (unsweetened, plain)
-
1 tablespoon baking powder (aluminum-free preferred)
-
¼ cup melted butter or coconut oil
-
¼ teaspoon salt
-
½ teaspoon xanthan gum or psyllium husk powder
-
½ cup finely ground almond flour (optional)
Instructions
-
Step 1
Preheat your oven to 350°F (175°C). Grease and line a small loaf pan. -
Step 2
In a medium bowl, whisk together the eggs until well combined. -
Step 3
Add the Greek yogurt, melted butter or coconut oil, and salt to the eggs. Whisk until smooth. -
Step 4
In a separate small bowl, whisk together the baking powder, xanthan gum or psyllium husk powder, and almond flour (if using). -
Step 5
Add the dry ingredients to the wet ingredients and whisk until just combined. Do not overmix. -
Step 6
Pour the batter into the prepared loaf pan. -
Step 7
Bake for 30-35 minutes, or until a toothpick inserted into the center comes out clean. -
Step 8
Let the bread cool in the pan for 10 minutes before transferring it to a wire rack to cool completely.
Important Information
Nutrition Facts (Per Serving)
It is important to consider this information as approximate and not to use it as definitive health advice.
Allergy Information
Please check ingredients for potential allergens and consult a health professional if in doubt.