Easter Bunny Chick Cupcakes- Cute & Easy Treat
Easter Bunny and Chick Cupcakes are the ultimate springtime treat that will have everyone hopping for joy! Who can resist these adorable little creations? They capture the very essence of Easter, bringin extractg together the playful charm of bunnies and the cheerful chirp of baby chicks in a delightfully edible package. These aren’t just any cupcakes; they are a centerpiece of fun, a guaranteed smile-inducer for both kids and adults. We love them because they transform a simple dessert into a festive activity, perfect for decorating parties or as a special surprise for your Easter brunch. What truly makes these Easter Bunny and Chick Cupcakes special is their customizable nature – you can get as creative as you like with frosting colors, sprinkles, and edible decorations to make each one uniquely yours. Get ready to bake up some magic!
Easter Bunny and Chick Cupcakes
Easter is a time for joy, family, and of course, delicious treats! These adorable Easter Bunny and Chick Cupcakes are the perfect way to add a touch of whimsy to your holiday table. They’re surprisingly easy to make, and the kids will have a blast helping you decorate. We’re going to transform simple vanilla cupcakes into the cutest bunny and chick characters that everyone will love. Get ready for some serious “awws” and delighted squeals when you present these festive creations!
Ingredients:
Instructions:
Preparing the Cupcakes and Frosting
1. First things first, let’s get our foundation ready. Bake your vanilla cupcakes according to the recipe instructions or your chosen cake mix. While they’re baking, prepare your fluffy vanilla frosting. If you’re using a store-bought tub, you might want to give it a good stir to ensure it’s smooth and spreadable. Once the cupcakes are baked, let them cool completely on a wire rack. This is a crucial step; frosting warm cupcakes is a recipe for a melty mess, and we want neat, well-defined decorations!
Decorating the Easter Bunny Cupcakes
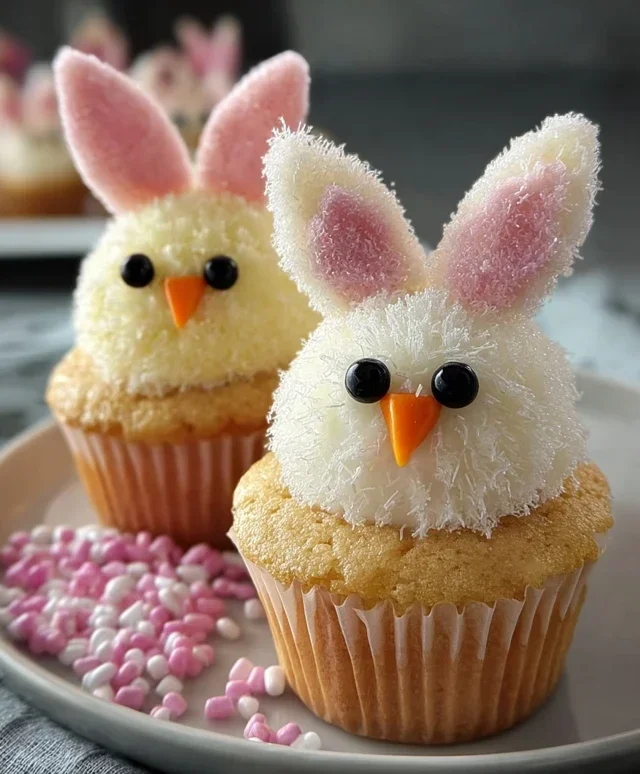
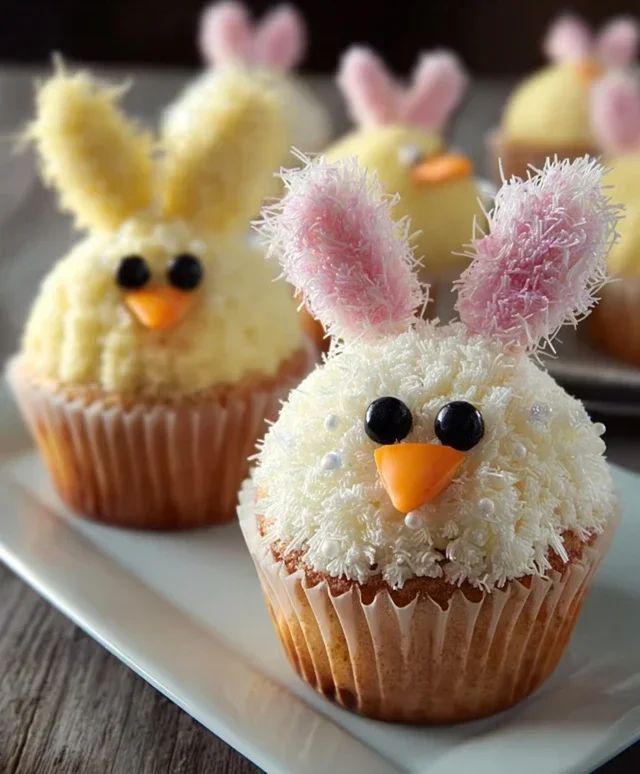
2. Now for the fun part – decorating! To create our adorable bunnies, we’ll start with the frosting. Take a generous scoop of your vanilla frosting and spread it evenly over the top of each cupcake, creating a nice, smooth base. Don’t worry about making it perfectly smooth; a little texture can add to the charm. Next, we’ll create the bunny ears. Take two mini marshmallows and place them upright on the top of the frosted cupcake, slightly angled outwards, to resemble bunny ears. To give them a bit of color and sparkle, gently dip the tips of the marshmallow ears into the pink colored sanding sugar. This will give them a subtle, sweet blush. For the bunny nose, place a pink jelly bean right in the center, between the marshmallow ears. Finally, use the black decorator icing to draw two tiny dots above the jelly bean nose for the bunny’s eyes. You can also add a small little mouth if you wish, or just leave it with the eyes and nose for a minimalist, cute look.
Decorating the Easter Chick Cupcakes
3. Time to bring out the sunshine with our chick cupcakes! This is where the yellow food coloring comes into play. Take a portion of your vanilla frosting (you can color it all yellow if you want, or just a batch for the chicks) and add a few drops of yellow food coloring. Stir until you achieve a cheerful, chick-like yellow. If it’s not yellow enough, add another drop or two. Now, frost your cupcakes with this vibrant yellow frosting. For the chick’s body and fluffy texture, we’ll use sprinkles! Gently roll the frosted tops of the cupcakes in the yellow and white sprinkles. This will give them a wonderfully fluffy, feathery appearance, just like a baby chick.
4. To create the chick’s face, we need a beak and eyes. For the beak, take a small piece of orange colored gum or an orange M&M and press it gently into the frosting at the top of the cupcake, just below where the “fluff” of sprinkles is densest. This will look like a perfect little beak. For the eyes, we have a couple of options. You can use the black decorator icing to draw two small dots. Alternatively, for a slightly different look, you can use two very tiny pieces of black licorice or even small black sprinkles if you have them. Place these just above the beak. Another cute alternative for the eyes is to use the white sprinkles and then add a tiny dot of black decorator icing in the center of each white sprinkle to create a bright, non-alcoholic alert eye.
5. Let’s add some extra flair to both our bunnies and chicks! For the bunnies, if you want them to have a slightly more textured look, you can lightly sprinkle some white sprinkles around the base of the marshmallow ears. This can help blend the ears into the frosting and give a softer appearance. For the chicks, if you feel like they need a bit more brightness, you can strategically place a few extra yellow sprinkles around the beak or around the edges of the cupcake for a pop of color. You can also try piping a small swirl of yellow frosting on top before adding the sprinkles for an extra dimension. The key is to have fun and be creative! Once all your cupcakes are decorated, arrange them on a festive platter and admire your handiwork. These are best enjoyed at room temperature, so if you’ve made them ahead of time, let them sit out for about 30 minutes before serving. Happy Easter decorating!
Conclusion:
There you have it! These Easter Bunny and Chick Cupcakes are an absolute delight for any Easter celebration, guaranteed to bring smiles to faces young and old. The simplicity of the base cupcake recipe, combined with the charming and easy-to-achieve decorations, makes them a perfect project for bakers of all skill levels. Imagin extracte these little guys adorning your Easter dessert table – they’re not just treats, they’re edible art that captures the spirit of the season!
For serving, these cupcakes are fantastic on their own, but they also pair wonderfully with a glass of milk or a refreshing fruit punch. Consider them the star of your Easter brunch or a delightful addition to an Easter egg hunt prize table. They’re also wonderful for sharing with friends and neighbors as a sweet holiday gesture.
If you’re feeling adventurous, don’t hesitate to explore variations! You can use different frosting colors to create a whole flock of pastel chicks or a variety of bunny hues. Consider adding a tiny sprinkle of edible glitter for extra sparkle, or even incorporating a bit of lemon zest into the cupcake batter for a bright citrus note that complements the spring theme.
I truly hope you’ll give this Easter Bunny and Chick Cupcakes recipe a try. It’s a rewarding and fun way to make your Easter extra special. Let your creativity shine and enjoy the delicious results!
Frequently Asked Questions:
Can I make the cupcakes ahead of time?
Absolutely! The cupcakes themselves can be baked a day or two in advance and stored in an airtight container at room temperature. For best results, it’s often easiest to decorate them on the day you plan to serve them, or at least a few hours beforehand to allow the frosting to set slightly.
What if I don’t have piping bags for the frosting?
No problem at all! You can still achieve great results without piping bags. For the bunny ears and chick beaks/eyes, you can use a spatula or a butter knife to spread and shape the frosting. For the bunny tail, a simple dollop of frosting from a spoon works beautifully. You can also transfer the frosting into a sturdy zip-top bag and snip off a small corner for a makeshift piping tool.
Are there any gluten-free or vegan options for this recipe?
Yes! This recipe is quite adaptable. You can easily substitute a good quality gluten-free flour blend for the all-purpose flour. For vegan versions, use a plant-based milk (like almond or soy), a vegan butter substitute, and ensure your eggs are replaced with a vegan binder like applesauce or a flax egg. Most frosting recipes can also be adapted with vegan butter and plant-based milk.
Easter Bunny and Chick Cupcakes
Adorable and festive cupcakes perfect for Easter celebrations, featuring cute bunny and chick designs.
Ingredients
-
1 recipe Vanilla Cupcakes (or your favorite cake mix)
-
1 recipe Fluffy Vanilla Frosting (or store-bought frosting)
-
Yellow and white sprinkles
-
Large and mini marshmallows
-
Pink colored sanding sugar
-
Black decorator icing
-
Jelly beans (pink for bunny noses)
-
Orange colored gum or M&Ms (for chick beaks)
-
Yellow food coloring (for chick frosting)
Instructions
-
Step 1
Bake vanilla cupcakes according to your preferred recipe or cake mix instructions. Let them cool completely. -
Step 2
Prepare the frosting. If making homemade frosting, follow your recipe. For chick cupcakes, tint a portion of the frosting with yellow food coloring until desired shade is achieved. -
Step 3
For Bunny Cupcakes: Frost the cooled cupcakes with white frosting. Use two mini marshmallows for ears, cut in half diagonally and attached to the top. Use a pink jelly bean for the nose and black decorator icing for the eyes. Dust with pink sanding sugar. -
Step 4
For Chick Cupcakes: Frost the cooled cupcakes with the yellow frosting. Place a large marshmallow on top as the body. Use an orange gum or M&M for the beak and black decorator icing for the eyes. -
Step 5
Decorate the cupcakes by adding yellow and white sprinkles around the base or on top for extra flair, resembling Easter grass. -
Step 6
Arrange the finished bunny and chick cupcakes on a platter for a festive Easter display.
Important Information
Nutrition Facts (Per Serving)
It is important to consider this information as approximate and not to use it as definitive health advice.
Allergy Information
Please check ingredients for potential allergens and consult a health professional if in doubt.