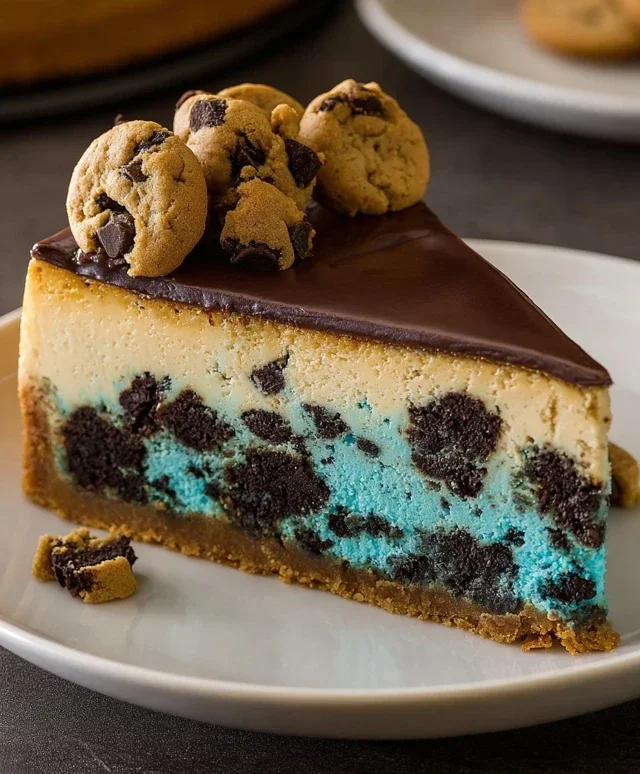
Cookie Monster Cheesecake Recipe-Fun & Delicious
Cookie Monster Cheesecake is more than just a dessert; it’s a vibrant explosion of childhood joy and decadent flavor, all swirled together in one irresistible treat. Who among us hasn’t been captivated by the blue furry phenomenon and his insatiable love for cookies? This isn’t just another cheesecake; it’s a playful homage to that iconic character, designed to bring a smile to your face with every bite. We’ve taken the creamy, dreamy goodness of a classic cheesecake and infused it with the beloved crunch and chocolatey essence of cookies, creating a truly unique dessert experience. Get ready to dive into layers of blue-hued magic, crum extractbled cookies, and a filling so rich and satisfying, it’ll have you yelling, “Om nom nom!” This Cookie Monster Cheesecake is guaranteed to be the star of any gathering, a sweet escape that taps into our inner child and satisfies our grown-up cravings for something truly spectacular.
Cookie Monster Cheesecake
Get ready to unleash your inner Cookie Monster with this outrageously delicious cheesecake! We’re talking about a creamy, dreamy cheesecake with a surprise chewy cookie crust and swirls of vibrant blue, studded with chocolate chips – just like your favorite furry friend would devour. This isn’t just a dessert; it’s an experience, a trip down memory lane, and a guaranteed crowd-pleaser. So, put on your blue jeans (or a fuzzy blue sweater!) and let’s get baking.
Ingredients:
The Irresistible Cookie Crust
The foundation of any great cheesecake is its crust, and for our Cookie Monster creation, we’re going beyond the typical grabeef ham cracker. We’re making a chewy, cookie-infused crust that is both delightful and a perfect complement to the rich cheesecake filling.
1. Prepare the Cookie Crust Mixture: In a medium bowl, combine the melted unsalted butter, 1/2 teaspoon of salt, and the packed brown sugar. Whisk these together until well combined and the sugar is mostly dissolved. Next, add the single egg and 1 teaspoon of vanilla extract to the butter and sugar mixture. Stir until everything is thoroughly incorporated and you have a smooth, glossy liquid.
2. Add the Dry Ingredients and Chocolate Chips: To the wet ingredients, gradually add the all-purpose flour. Stir gently until just combined – be careful not to overmix, as this can lead to a tough crust. Once the flour is incorporated, gently fold in the semisweet mini chocolate chips. The dough will be thick and slightly sticky, but that’s exactly what we’re looking for.
3. Form the Crust: Press this cookie dough evenly into the bottom of a 9-inch springform pan. You want a firm, compact layer. You can use the bottom of a glass or your fingers to press it down firmly, ensuring it reaches all the edges. We’re not pre-baking this crust, as it will bake alongside the cheesecake filling, resulting in a perfectly chewy texture.
The Dreamy Cheesecake Filling
Now for the star of the show – the creamy, velvety cheesecake filling. We’ll be adding that signature Cookie Monster blue to make it truly stand out.
4. Beat the Cream Cheese and Sugar: In a large bowl, using an electric mixer (or a stand mixer with a paddle attachment), beat the softened cream cheese until it’s completely smooth and free of lumps. This is a crucial step for a silky-smooth cheesecake. Scrape down the sides of the bowl as needed. Add the granulated sugar and the pinch of salt, and beat again until well combined and fluffy.
5. Incorporate Eggs and Vanilla: Add the three eggs, one at a time, beating well after each addition until just incorporated. Do not overmix the eggs, as this can introduce too much air and cause the cheesecake to crack. Stir in the remaining 1 teaspoon of vanilla extract.
6. Add Cornflour and Whipping Cream: In a small separate bowl, whisk the cornflour into the cold whipping cream until no lumps remain. This helps to prevent the cornflour from clumping in the cheesecake batter. Slowly pour this mixture into the cream cheese batter and mix on low speed until just combined.
7. Achieve Cookie Monster Blue: Now for the fun part! Add a few drops of blue gel food coloring to the cheesecake batter. Start with a small amount and add more as needed, mixing gently until you achieve a vibrant, playful blue hue that reminds you of our favorite fuzzy friend. Don’t be afraid to get creative with the shade! You can even swirl in a little extra food coloring at the end for a marbled effect.
Assembling and Baking Your Masterpiece
The final steps bring everything together for that perfect bake.
8. Pour and Bake: Carefully pour the blue cheesecake filling over the cookie crust in the springform pan. Gently tap the pan on the counter a few times to release any air bubbles. Place the springform pan on a baking sheet (this will catch any potential drips). Bake in a preheated oven at 325°F (160°C) for 50-60 minutes, or until the edges are set and the center is still slightly jiggly. The cheesecake will continue to set as it cools.
9. Cooling and Chilling: Once baked, turn off the oven and leave the cheesecake inside with the door slightly ajar for about an hour. This slow cooling process helps prevent cracking. After the hour, carefully remove the cheesecake from the oven and let it cool completely on a wire rack. Once at room temperature, cover the cheesecake with plastic wrap and refrigerate for at least 6 hours, or preferably overnight, to allow the flavors to meld and the cheesecake to fully set.
This Cookie Monster Cheesecake is sure to bring smiles and rave reviews. Serve it chilled, perhaps with a dollop of whipped cream and a few extra chocolate chips for good measure. Enjoy every spoonful of this delightful, blue-hued treat!

Conclusion:
And there you have it – your very own, incredibly fun, and utterly delicious Cookie Monster Cheesecake! This recipe is a guaranteed crowd-pleaser, bringin extractg together the creamy, dreamy texture of classic cheesecake with the irresistible flavors and textures of chocolate chip cookies and that iconic blue hue. It’s the perfect dessert for birthdays, holidays, or just because you deserve a treat. The vibrant color alone is enough to spark joy, and the taste? Pure bliss. I encourage you to dive in and create this masterpiece; you won’t regret it!
For serving suggestions, I love pairing this cheesecake with a scoop of vanilla ice cream or a dollop of whipped cream. A sprinkle of extra cookie crum extractbles on top adds a delightful textural contrast. If you’re feeling adventurous, consider adding mini chocolate chips directly into the cheesecake batter before baking for even more chocolatey goodness, or perhaps a swirl of blue cookie dough for an extra layer of flavor and visual appeal.
Frequently Asked Questions:
Can I make this Cookie Monster Cheesecake ahead of time?
Absolutely! Cheesecake is often even better the next day. You can bake it a day in advance, let it cool completely, and then refrigerate it, covered, overnight. This allows the flavors to meld and the cheesecake to set perfectly.
What is the best way to get the blue color without using artificial food coloring?
While artificial food coloring provides the most vibrant and consistent blue, you can experiment with natural alternatives like butterfly pea flower powder. The color might be a bit more muted, but it’s a healthier option. You might need to adjust the amount to achieve your desired shade.
How do I store leftover cheesecake?
Store any leftover Cookie Monster Cheesecake in an airtight container in the refrigerator for up to 3-4 days. Enjoy your delightful creation!
Cookie Monster Cheesecake
A delightful cheesecake inspired by the beloved Cookie Monster, featuring a cookie crust and a vibrant blue cheesecake filling.
Ingredients
-
4 oz unsalted butter, melted
-
2.6 oz brown sugar, tightly packed
-
1/2 tsp salt
-
4.4 oz all-purpose flour
-
4 oz semisweet mini chocolate chips
-
16 oz cream cheese, softened
-
3.5 oz granulated sugar
-
2 tsp cornflour
-
1 tsp vanilla extract
-
3 eggs
-
1/2 cup whipping cream
-
Blue gel food coloring
Instructions
-
Step 1
Preheat oven to 350°F (175°C). Lightly grease a 9-inch springform pan. -
Step 2
In a bowl, combine melted butter, brown sugar, and 1/2 tsp salt. Stir in flour and chocolate chips until just combined. Press mixture into the bottom of the prepared springform pan to form the crust. -
Step 3
In a large bowl, beat cream cheese until smooth. Gradually beat in granulated sugar and cornflour. Mix in 1 tsp vanilla extract and a pinch of salt. -
Step 4
Beat in eggs one at a time until just combined. Stir in whipping cream and enough blue gel food coloring to achieve a vibrant Cookie Monster blue. Pour batter over the prepared crust. -
Step 5
Bake for 45-55 minutes, or until the edges are set and the center is slightly jiggly. -
Step 6
Turn off the oven, crack the door open slightly, and let the cheesecake cool in the oven for 1 hour. Remove from oven and cool completely on a wire rack. Chill in the refrigerator for at least 4 hours before serving.
Important Information
Nutrition Facts (Per Serving)
It is important to consider this information as approximate and not to use it as definitive health advice.
Allergy Information
Please check ingredients for potential allergens and consult a health professional if in doubt.