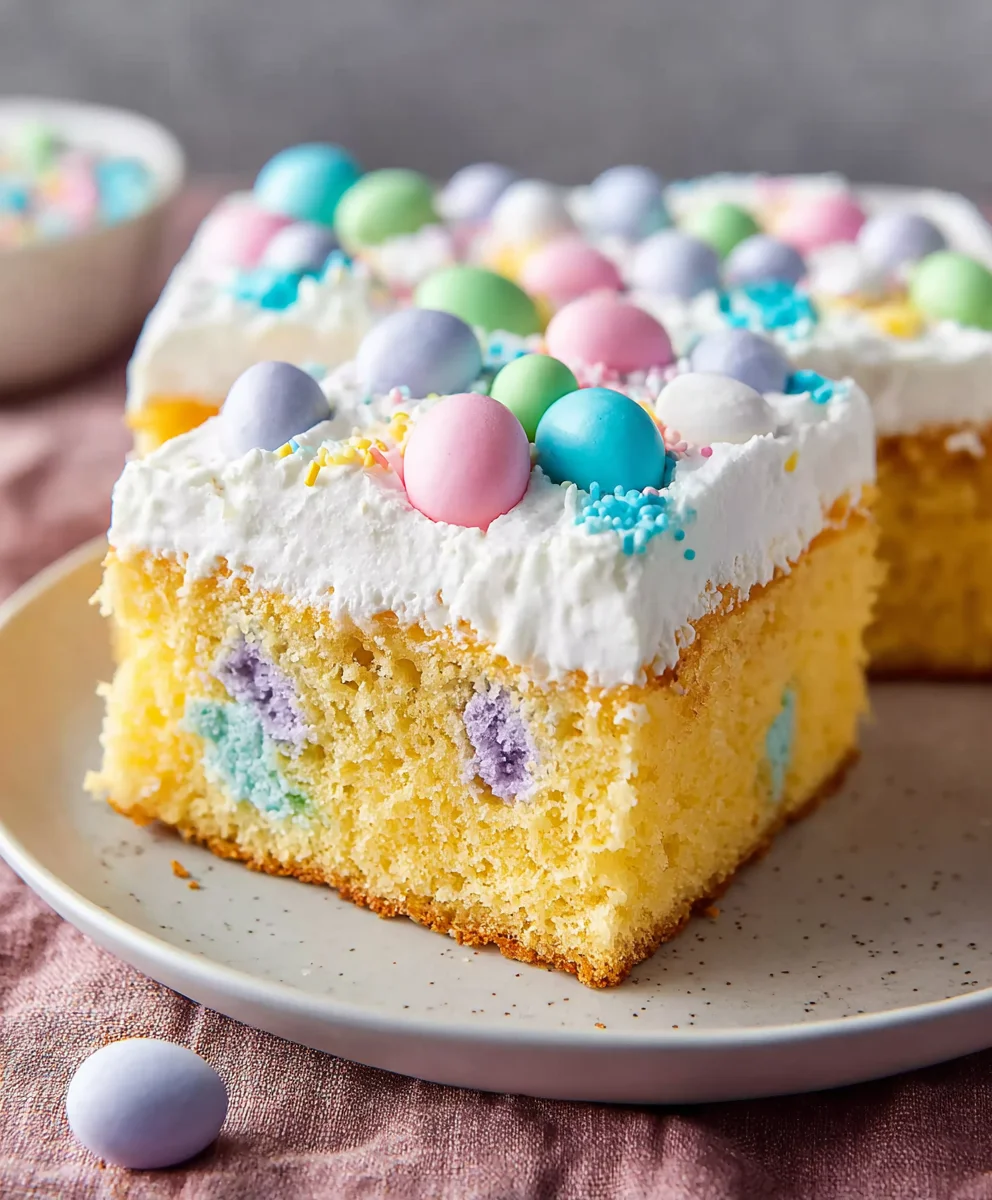
Easy Easter Poke Cake – Delicious Spring Treat
Easter Poke Cake is more than just a dessert; it’s a celebration on a plate! Imagin extracte a fluffy, tender cake, soaked in a vibrant, sweet liquid that infuses every single crum extractb with incredible moisture and flavor. This isn’t your average sheet cake. What makes the Easter Poke Cake so utterly irresistible? It’s the magical transformation that happens as the luscious filling seeps into the cake’s airy structure, creating pockets of pure joy. People adore this treat because it’s visually stunning, often adorned with pastel colors and festive toppings that perfectly capture the spirit of springtime and renewal. It’s a guaranteed crowd-pleasgin extract bringing smiles and delight to every Easter gathering. Get ready to discover how to create this delightful masterpiece that will have everyone asking for seconds (and thirds!).
Ingredients:
- 15.25 ounce white cake mix
- 3 egg whites
- ½ cup vegetable oil
- ½ cup plain Greek yogurt
- ¾ cup whole milk (for the cake batter)
- Pink, yellow, and blue gel food coloring
- 5.1 ounces instant vanilla pudding mix
- 2 ¾ cups whole milk (for the pudding)
- 2 cups heavy cream
- 3 Tablespoons granulated sugar
- 1 cup sweetened shredded coconut
- Easter sprinkles and/or mini eggs for topping
Baking the Easter Poke Cake Base
Step 1: Prepare the Cake Batter
First things first, let’s get our cake batter ready. Preheat your oven to the temperature recommended on your white cake mix box, typically around 350°F (175°C). Grease and flour a 9×13 inch baking pan. In a large mixing bowl, combine the white cake mix with the 3 egg whites, ½ cup vegetable oil, and ½ cup plain Greek yogurt. These ingredients will add a wonderful tenderness and moisture to our cake. Greek yogurt is a fantastic secret weapon for moist cakes, as it adds fat and acidity without being overpowering. Now, gradually add the ¾ cup of whole milk, mixing until just combined. Be careful not to overmix the batter, as this can lead to a tough cake. A few small lumps are perfectly fine.
Step 2: Color and Bake the Cake Layers
This is where the “poke” magic begin extracts! Divide your cake batter into three separate bowls. We’ll color each bowl with one of our Easter shades: pink, yellow, and blue. Add just a drop or two of gel food coloring to each bowl and gently stir until the color is evenly distributed. Gel food coloring is concentrated, so a little goes a long way. You want vibrant colors, but avoid adding too much, which can alter the cake’s texture. Now, we’re going to create a marbled effect in the pan. Dollop spoonfuls of each colored batter randomly over the greased and floured baking pan. Don’t worry about being neat; the randomness is part of the fun and will create beautiful swirls. Once all the batter is in the pan, gently swirl a toothpick or knife through the colors a few times to enhance the marbled effect. Place the pan in your preheated oven and bake according to the cake mix box directions, usually around 30-35 minutes, or until a toothpick inserted into the center comes out clean. Let the cake cool in the pan for about 10 minutes before inverting it onto a wire rack to cool completely.
Creating the Luscious Pudding Filling
Step 3: Make the Vanilla Pudding
While our cake is cooling, let’s prepare the creamy vanilla pudding that will fill our poke holes. In a medium mixing bowl, whisk together the 5.1 ounces of instant vanilla pudding mix with 2 ¾ cups of whole milk. Whisk vigorously for about 2 minutes, ensuring there are no lumps. The pudding will start to thicken almost immediately. For an extra smooth texture, you can press a piece of plastic wrap directly onto the surface of the pudding to prevent a skin from forming. Set this aside to continue thickening as it cools.
Step 4: Whip the Cream and Combine
Now for the fluffy topping! In a separate large bowl, or the bowl of a stand mixer fitted with the whisk attachment, combine the 2 cups of heavy cream with the 3 Tablespoons of granulated sugar. Beat on medium-high speed until stiff peaks form. You want the cream to be light, airy, and hold its shape when you lift the whisk. Be careful not to over-whip, or you’ll end up with butter! Once the whipped cream is ready, gently fold it into the thickened vanilla pudding. Be delicate with your folding motion to maintain the airiness of the whipped cream. This mixture will become our wonderfully light and creamy filling.
Assembling and Decorating Your Easter Poke Cake
Step 5: Poke and Fill the Cake
Once the cake has cooled completely, it’s time for the filling! Using the handle of a wooden spoon or a large skewer, poke holes all over the surface of the cooled cake. Make the holes about 1 inch apart and go down about two-thirds of the way into the cake. Don’t poke all the way through to the bottom. The more holes you make, the more filling will seep into the cake, making it extra moist and delicious. Gently spoon or pour the vanilla pudding and whipped cream mixture evenly over the top of the poked cake, allowing it to fill all those wonderful holes. Use an offset spatula to spread it smoothly to the edges of the cake.
Step 6: Chill and Decorate
To allow the pudding to set and the flavors to meld, cover the cake loosely with plastic wrap and refrigerate for at least 2-3 hours, or preferably overnight. This chilling time is crucial for the best texture. Before serving, it’s time for the final festive touch! Sprinkle the 1 cup of sweetened shredded coconut evenly over the top of the pudding. This adds a lovely texture and a hint of tropical sweetness. Finally, scatter your Easter sprinkles and/or mini eggs generously over the coconut. This is where you can really let your creativity shine and make your Easter Poke Cake look as joyful as it tastes! Slice and serve chilled.

Conclusion:
We hope you’ve enjoyed diving into the delightful process of making our vibrant Easter Poke Cake! This recipe offers a fantastic way to celebrate the season with a moist, flavorful cake bursting with bright, festive colors. The simple steps make it accessible for bakers of all skill levels, and the end result is always a showstopper that will have your guests asking for seconds. Feel free to get creative with the toppings and decorations to truly make this Easter Poke Cake your own.
This Easter Poke Cake is perfect served chilled, allowing the pudding to fully set and meld with the cake. For serving suggestions, consider a dollop of whipped cream, fresh berries, or even a sprinkle of edible glitter for extra sparkle. This cake also makes a wonderful addition to any Easter brunch or dessert table.
Don’t be afraid to experiment with variations! You can use different flavors of Jell-O, experiment with flavored puddings, or even swap out the Cool Whip for homemade whipped cream. For an extra fruity twist, try folding in some finely diced pineapple or mandarin oranges into the whipped topping before spreading it over the cake. The possibilities are truly endless!
Frequently Asked Questions:
Can I make the Easter Poke Cake ahead of time?
Absolutely! It’s actually best to make this Easter Poke Cake at least a few hours, or even a day, in advance. This allows the pudding to fully soak into the cake and the flavors to meld beautifully. Store it covered in the refrigerator.
What if I don’t have the specific Jell-O flavors listed?
Feel free to substitute! The key is to choose Jell-O flavors that complement each other and offer a nice visual appeal. Pastel colors are ideal for Easter. Think about fruity combinations like strawberry and lime, or lemon and raspberry. The important part is that the liquid from the Jell-O soaks into the cake.
Easy Easter Poke Cake – Delicious Spring Treat
A vibrant and moist poke cake perfect for Easter celebrations, featuring colorful marbled cake layers filled with creamy vanilla pudding and whipped cream, topped with coconut and festive decorations.
Ingredients
-
15.25 ounce white cake mix
-
3 egg whites
-
½ cup vegetable oil
-
½ cup plain Greek yogurt
-
¾ cup whole milk
-
Pink, yellow, and blue gel food coloring
-
5.1 ounces instant vanilla pudding mix
-
2 ¾ cups whole milk
-
2 cups heavy cream
-
3 Tablespoons granulated sugar
-
1 cup sweetened shredded coconut
-
Easter sprinkles and/or mini eggs for topping
Instructions
-
Step 1
Preheat oven to 350°F (175°C). Grease and flour a 9×13 inch baking pan. In a large bowl, combine cake mix, egg whites, vegetable oil, and Greek yogurt. Gradually add ¾ cup whole milk, mixing until just combined. Do not overmix. -
Step 2
Divide batter into three bowls and color each with pink, yellow, and blue gel food coloring. Dollop spoonfuls of each colored batter randomly into the prepared pan to create a marbled effect. Gently swirl with a toothpick or knife. Bake for 30-35 minutes, or until a toothpick comes out clean. Cool in pan for 10 minutes, then invert onto a wire rack to cool completely. -
Step 3
While cake cools, whisk instant vanilla pudding mix with 2 ¾ cups whole milk in a medium bowl for about 2 minutes until thickened. Cover surface with plastic wrap to prevent skin formation and set aside. -
Step 4
In a separate bowl, whip heavy cream and granulated sugar on medium-high speed until stiff peaks form. Gently fold whipped cream into the thickened vanilla pudding. -
Step 5
Once the cake is completely cool, poke holes all over the surface using the handle of a wooden spoon or skewer, about 1 inch apart and two-thirds of the way down. Spoon or pour the pudding and whipped cream mixture evenly over the poked cake, filling all holes. Spread smoothly to the edges. -
Step 6
Cover loosely with plastic wrap and refrigerate for at least 2-3 hours, or preferably overnight. Before serving, sprinkle sweetened shredded coconut over the top, followed by Easter sprinkles and/or mini eggs.
Important Information
Nutrition Facts (Per Serving)
It is important to consider this information as approximate and not to use it as definitive health advice.
Allergy Information
Please check ingredients for potential allergens and consult a health professional if in doubt.