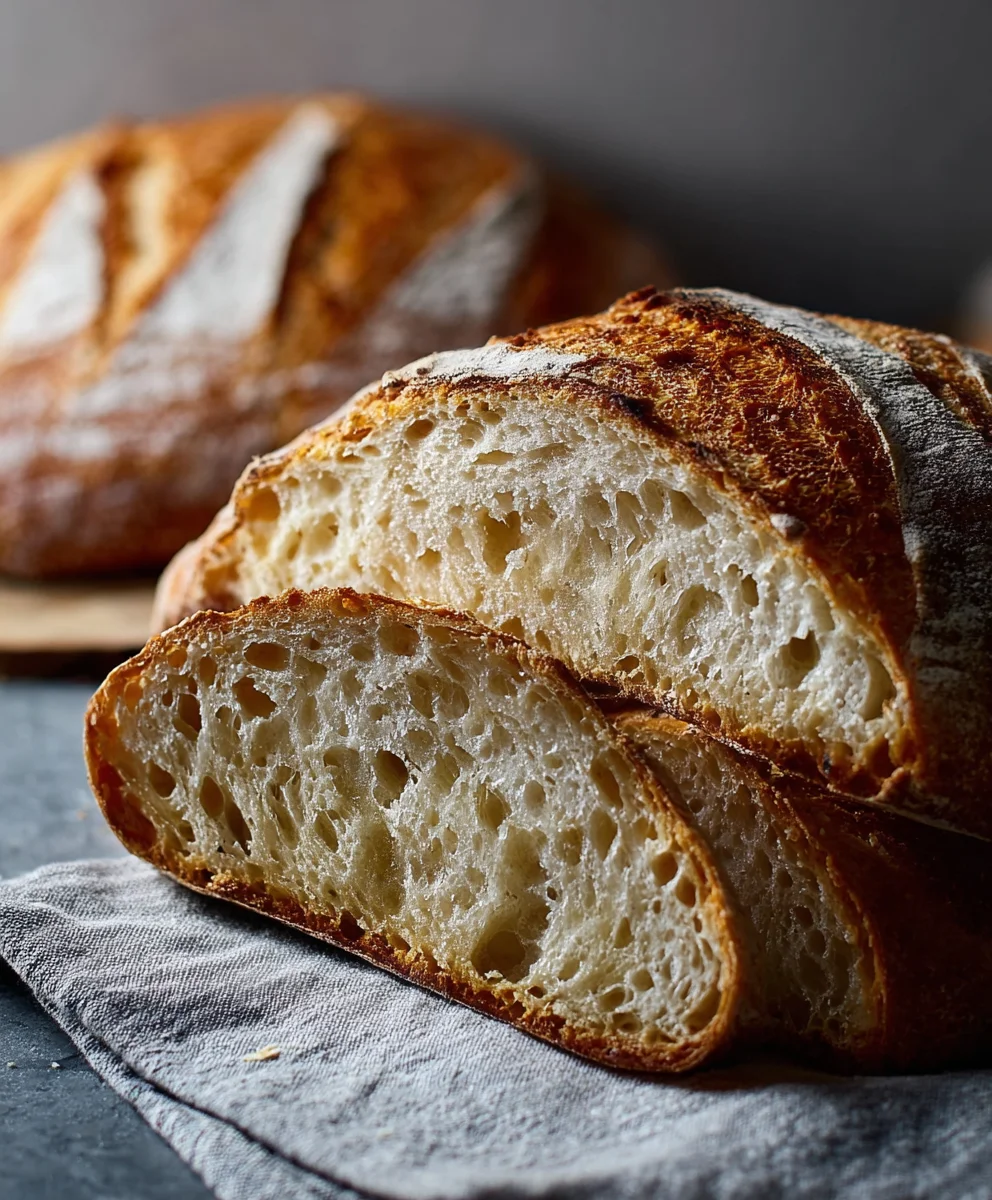
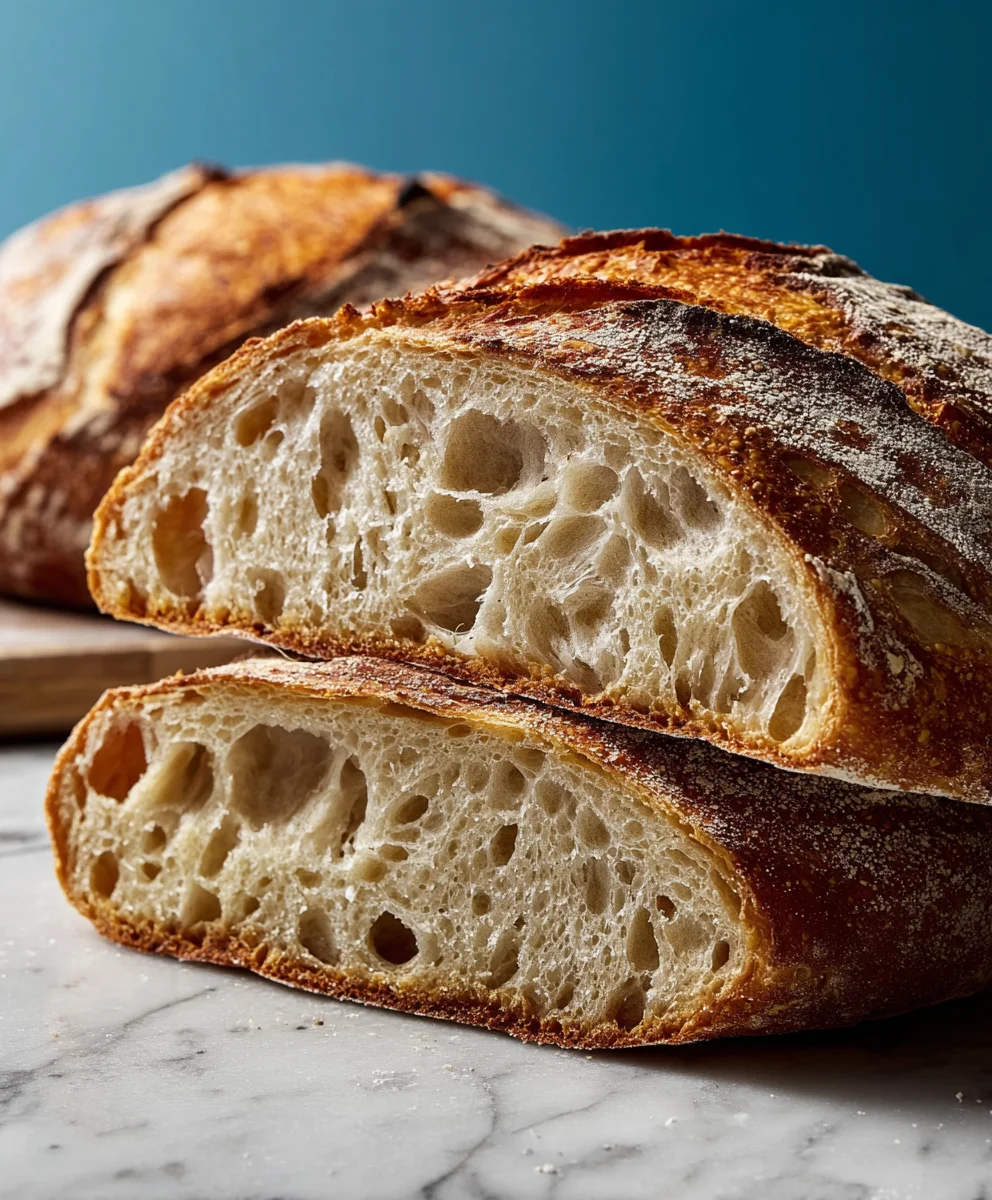
Easy Sourdough Bread Recipe – Crusty Artisan Loaf
Sourdough Bread. Ah, the very name conjures images of crusty exteriors, impossibly airy interiors, and that inimitable tangy aroma. If you’ve ever experienced the magic of a truly well-made loaf, you understand why this ancient form of breadmaking has experienced such a resurgence. People adore sourdough bread not just for its complex flavor profile, which develops over days through the natural fermentation process, but also for the deeply satisfying ritual of creating it. There’s a primal connection to baking with a living starter, a symbiotic relationship between baker and culture. What truly makes sourdough bread special is its inherent digestibility, the unique texture that ranges from chewy to tender depending on hydration, and the sheer versatility it offers. Whether it’s the foundation for a humble cheese sandwich, the star of your avocado toast, or simply enjoyed slathered with butter, this Sourdough Bread recipe will guide you towards achieving baking perfection right in your own kitchen.
Ingredients:
- 4 cups (500g) bread flour, or all-purpose flour if bread flour is unavailable
- 1⅔ cups (375g) warm water (around 90-100°F or 32-38°C)
- 1 cup (200g) active sourdough starter, bubbly and fed
- 2 teaspoons (10g) salt
Preparing the Dough
Autolyse: A Gentle Start
The first step to achieving a beautifully open crum extractb in your sourdough bread is to create a simple mixture of flour and water, a process known as autolyse. This resting period allows the flour to fully hydrate, initiating gluten development without any physical manipulation. In a large mixing bowl, combine the 4 cups (500g) of bread flour with the 1⅔ cups (375g) of warm water. Use your hands or a sturdy spatula to mix until no dry flour remains. The mixture will be shaggy and sticky, and that’s perfectly fine. Cover the bowl with a damp kitchen towel or plastic wrap and let it rest for at least 30 minutes, or up to an hour. This resting time is crucial; it makes the dough more extensible and easier to handle later on, and it’s the secret to that tender interior.
Incorporating the Starter and Salt
After the autolyse period, you’ll notice the flour mixture has become smoother and more cohesive. Now it’s time to introduce the heart of our sourdough: the active sourdough starter. Gently pour the 1 cup (200g) of bubbly, active sourdough starter onto the rested dough. It’s important that your starter is active – meaning it has been fed within the last 4-12 hours and is showing vigorous signs of fermentation like doubling in size and having a light, airy texture. Next, sprinkle the 2 teaspoons (10g) of salt over the top. Now, it’s time to get your hands in there! Fold the starter and salt into the dough. You can do this by pinching, folding, and squeezing the dough until everything is well incorporated. This will take a few minutes, and the dough will feel quite wet and sticky, but keep working it until it starts to come together as a more unified mass. Don’t worry about achieving a perfectly smooth dough at this stage; the gluten will develop further with subsequent steps.
Developing the Dough: Stretch and Folds
The First Set of Stretch and Folds
Once the starter and salt are fully integrated, we begin extract the process of building gluten strength through a series of “stretch and folds.” This technique involves gently stretching a portion of the dough up and over itself, repeating this around the bowl. To perform the first set of stretch and folds, wet your hands slightly to prevent sticking. Grab the edge of the dough furthest from you, stretch it upwards gently, and then fold it over towards the center of the bowl. Rotate the bowl a quarter turn and repeat this process – stretch and fold – four times in total, creating a roughly square shape in the bowl. After completing the four folds, cover the bowl and let the dough rest for 30 minutes. This resting period allows the gluten structure to relax and re-align, preparing it for the next set of folds.
Subsequent Stretch and Folds and Bulk Fermentation
We will continue with sets of stretch and folds every 30 minutes for about 2 to 3 hours. So, after the first set and its rest, perform another set of four stretch and folds, then rest for 30 minutes. Repeat this process for a total of 3 to 4 sets. As you continue these folds, you will notice a significant change in the dough’s texture. It will become smoother, more elastic, and more resilient. You’ll be able to stretch it thinner without it tearing easily. The dough will also start to increase in volume, which indicates that the wild yeasts in your sourdough starter are actively fermenting. This entire period, from the initial mixing to when the dough has visibly increased in size and shows signs of fermentation (like small bubbles on the surface), is called bulk fermentation. We are looking for the dough to increase by about 30-50% in volume.
Shaping and Baking
Pre-Shaping and Bench Rest
Once bulk fermentation is complete and your dough has a beautiful, airy texture and has increased in volume, it’s time to shape it. Lightly flour your work surface. Gently turn the dough out of the bowl onto the floured surface. Be careful not to deflate the precious air bubbles you’ve worked so hard to create. For pre-shaping, gently form the dough into a loose round or oblong shape. The goal here is to create some surface tension without being too tight. Let the dough rest, uncovered, on the counter for about 20-30 minutes. This “bench rest” allows the gluten to relax, making the final shaping much easier and preventing the dough frgin extractspringing back too much.
Final Shaping and Cold Proof
After the bench rest, it’s time for the final shaping. Flour your hands and the surface lightly again. Gently shape the dough into its final form, whether it’s a round boule or an oblong batard. The key is to create good surface tension by tucking the dough under itself, creating a taut “skin” on the outside. Once shaped, you will place your dough into a well-floured banneton or a bowl lined with a floured tea towel. Cover the banneton loosely with plastic wrap or place it inside a plastic bag. Now, the dough needs to chill in the refrigerator for at least 12 hours, and up to 24 hours. This cold proofing, or retardation, develops more complex flavors and makes the dough easier to score and handle.
Baking the Sourdough Bread
Preheat your oven to 475°F (245°C) with your Dutch oven (or baking vessel) inside for at least 30 minutes. Once the oven is fully preheated, carefully remove the hot Dutch oven from the oven. Gently turn your proofed dough out of the banneton and onto a piece of parchment paper. Score the top of the dough with a sharp knife or a lame. Scoring helps control where the bread expands during baking and creates beautiful patterns. Carefully lower the dough (using the parchment paper as handles) into the hot Dutch oven. Cover the Dutch oven with its lid and bake for 25 minutes. After 25 minutes, remove the lid, reduce the oven temperature to 450°F (230°C), and continue baking for another 20-25 minutes, or until the crust is a deep golden brown and the internal temperature reaches at least 200°F (93°C). Remove the bread from the Dutch oven and let it cool completely on a wire rack before slicing. This cooling period is essential frum extractthe crumb to set properly.
Conclusion:
There you have it – your guide to creating delicious, homemade Sourdough Bread! We’ve covered everything from feeding your starter to achieving that perfect crust and airy crum extractb. This recipe is more than just baking; it’s a rewarding journey that connects you with a time-honored tradition. Don’t be discouraged if your first loaf isn’t perfect; the beauty of sourdough is in its continuous improvement and unique character.
For serving suggestions, this Sourdough Bread is incredibly versatile. Enjoy it toasted with butter, as the base for avocado toast, or alongside your favorite soups and stews. It also makes a fantastic sandwich bread, holding up beautifully to hearty fillings. If you’re feeling adventurous, consider variations like adding herbs, cheese, or even olives to the dough for an extra flavor dimension.
The most important ingredient is patience and a willingness to learn. Embrace the process, and soon you’ll be pulling warm, fragrant loaves of Sourdough Bread from your oven with pride. Happy baking!
Frequently Asked Questions about Sourdough Bread:
Q1: My sourdough starter isn’t very active. What can I do?
If your starter is sluggish, ensure you’re feeding it regularly with equal parts flour and water, at room temperature. Avoid drafts and extreme temperatures. You might need to feed it more frequently for a few days to revive its activity. Look for consistent bubbling and a pleasant, slightly sour aroma.
Q2: How long does sourdough bread last?
Homemade Sourdough Bread typically stays fresh for 3-4 days at room temperature when stored properly in a bread box or loosely wrapped in a paper bag. For longer storage, you can slice and freeze it, toasting slices directly from frozen.
Easy Sourdough Bread Recipe – Crusty Artisan Loaf
A straightforward recipe for creating a crusty, artisan sourdough loaf with a beautiful open crumb, perfect for home bakers.
Ingredients
-
4 cups (500g) bread flour or all-purpose flour
-
1⅔ cups (375g) warm water
-
1 cup (200g) active sourdough starter
-
2 teaspoons (10g) salt
-
Parchment paper
Instructions
-
Step 1
Autolyse: Combine flour and warm water in a large bowl until no dry flour remains. Cover and let rest for 30 minutes to 1 hour. -
Step 2
Incorporate Starter and Salt: Add active sourdough starter and salt to the rested dough. Mix by pinching, folding, and squeezing until incorporated. Dough will be wet and sticky. -
Step 3
Stretch and Folds: Perform 3-4 sets of stretch and folds every 30 minutes for 2-3 hours, allowing the dough to rest between sets. Dough will become smoother and more elastic. Bulk fermentation is complete when dough has increased 30-50% in volume. -
Step 4
Shaping: Gently turn dough onto a lightly floured surface. Pre-shape into a loose round or oblong. Let rest uncovered for 20-30 minutes (bench rest). Then, perform final shaping, creating good surface tension. Place shaped dough into a well-floured banneton or lined bowl. -
Step 5
Cold Proof: Cover the banneton and refrigerate for at least 12 hours, up to 24 hours. -
Step 6
Baking: Preheat oven to 475°F (245°C) with a Dutch oven inside for at least 30 minutes. Carefully turn proofed dough onto parchment paper, score the top. Lower dough into hot Dutch oven, cover, and bake for 25 minutes. Remove lid, reduce oven to 450°F (230°C), and bake for another 20-25 minutes until deep golden brown. -
Step 7
Cooling: Remove bread from Dutch oven and let cool completely on a wire rack before slicing.
Important Information
Nutrition Facts (Per Serving)
It is important to consider this information as approximate and not to use it as definitive health advice.
Allergy Information
Please check ingredients for potential allergens and consult a health professional if in doubt.