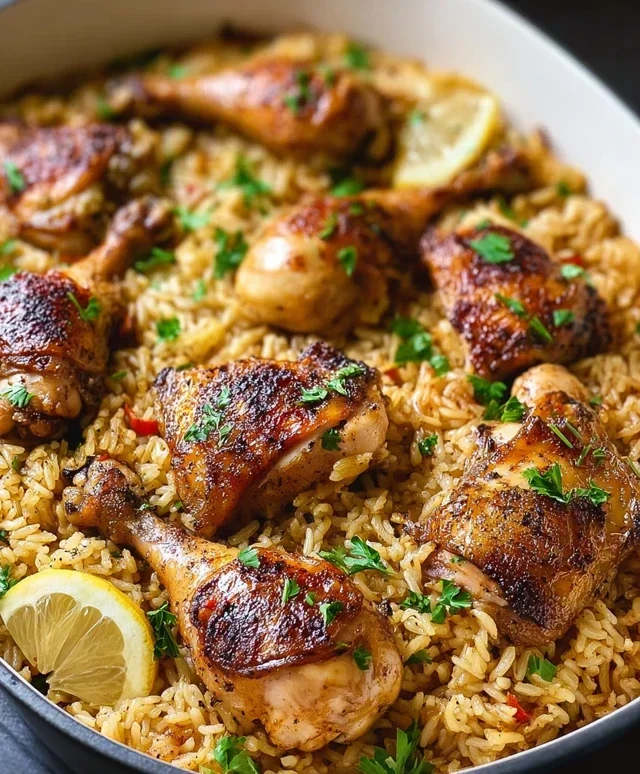
Easy Baked Chicken Legs and Rice Recipe
Baked Chicken Legs and Rice is more than just a meal; it’s a hug in a bowl. This classic comfort food has a way of bringin extractg people together, eliciting sighs of satisfaction with every flavorful bite. There’s something undeniably magical about the tender, juicy chicken legs, perfectly seasoned and baked to a golden crisp, nestled atop a bed of fluffy, savory rice. It’s the kind of dish that transcends busy weeknights and special occasions alike, a reliable go-to that never disappoints. What truly makes this Baked Chicken Legs and Rice recipe special is its effortless simplicity, allowing the natural goodness of the ingredients to shine through. It’s incredibly forgiving, making it a fantastic option for both novice cooks and seasoned kitchen pros looking for a reliably delicious and crowd-pleasing meal.
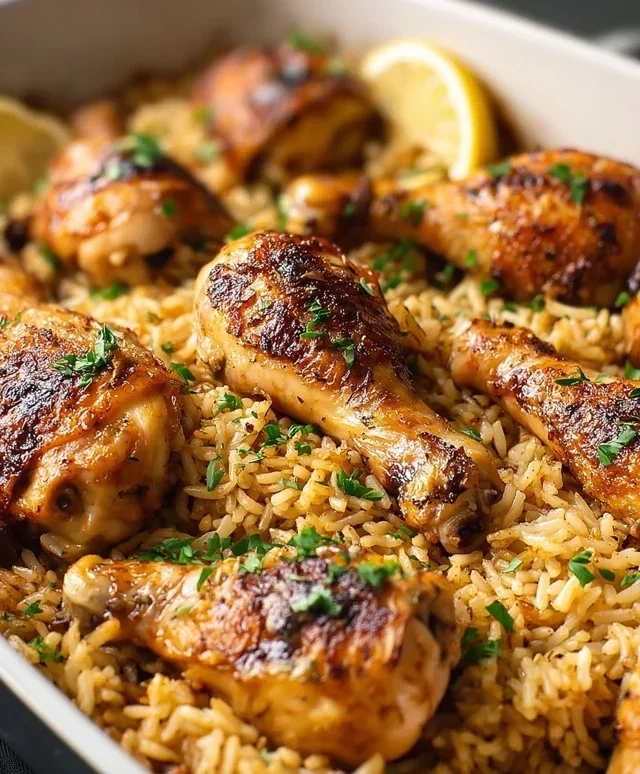
Baked Chicken Legs and Rice
This recipe for Baked Chicken Legs and Rice is my go-to for a comforting and effortlessly delicious meal. It’s the kind of dish that fills your kitchen with an inviting aroma as it bakes, promising a satisfying and wholesome dinner that requires minimal fuss. The chicken legs become incredibly tender and flavorful, with a slightly crispy skin, while the rice absorbs all those delicious juices and seasonings, creating a perfectly balanced one-pan wonder. It’s ideal for busy weeknights but special enough for a casual gathering.
Ingredients:
Cooking Instructions
Preparing the Chicken
First things first, let’s get our chicken legs ready for their flavor bath. You’ll want to preheat your oven to 400°F (200°C). While the oven is heating up, pat your chicken legs dry with paper towels. This step is crucial for achieving crispy skin, as excess moisture can steam the skin instead of browning it. In a small bowl, combine the olive oil, brown sugar, smoked paprika, dried thyme, dried oregano, garlic powder, 1 teaspoon of kosher salt, and the fresh-ground black pepper. Mix this all together to form a fragrant paste. Now, place your dried chicken legs in a larger bowl or directly into your baking dish and generously coat them with this amazing spice rub, making sure to get it under the skin if you can for maximum flavor. Let them sit for at least 10-15 minutes while you prepare the rice; this allows the flavors to meld beautifully.
Once the chicken is seasoned and your oven is at temperature, it’s time to get this started. Arrange the seasoned chicken legs in a single layer in a 9×13 inch baking dish or a similar-sized oven-safe skillet. We want them to have plenty of space for even cooking and browning. Pop them into the preheated oven and let them bake for about 20 minutes. This initial bake will start rendering the fat and giving the chicken a head start on cooking.
Cooking the Rice Base
While the chicken is doing its initial bake, we’ll get the rice ready. In a separate saucepan or skillet (if your baking dish isn’t large enough to accommodate the rice around the chicken later), melt the butter over medium heat. Add the chopped yellow onion and sauté until it becomes softened and translucent, which usually takes about 5-7 minutes. Don’t rush this step; the softened onion adds a wonderful sweetness and depth of flavor to the rice. Then, add the minced garlic and cook for another minute until fragrant, being careful not to burn it. Stir in the uncooked white rice and toast it in the butter and onion mixture for about 1-2 minutes. Toasting the rice helps to prevent it from becoming mushy and adds a subtle nutty flavor.
Now it’s time to bring it all together. Carefully pour in the chicken broth and water. Add the remaining 1/2 teaspoon of kosher salt. Stir everything well to combine and bring the liquid to a gentle simmer. Once it’s simmering, remove it from the heat.
Combining and Baking
After the chicken has baked for its initial 20 minutes, carefully remove the baking dish from the oven. You’ll notice the chicken has already started to brown nicely. Now, carefully pour the partially cooked rice mixture (from the saucepan) into the baking dish, around and amongst the chicken legs. Try to ensure the rice is mostly submerged in the liquid. If any chicken legs are significantly covered by rice, gently lift them slightly to expose more of the skin. Return the baking dish to the oven, uncovered. Continue baking for another 30-35 minutes, or until the rice is tender and has absorbed most of the liquid, and the chicken is cooked through and beautifully browned. The internal temperature of the chicken should reach 165°F (74°C). You can easily check this by inserting a meat thermometer into the thickest part of a chicken leg, avoiding the bone.
Once everything is cooked to perfection, carefully remove the baking dish from the oven. Let it rest for about 5-10 minutes before serving. This resting period allows the juices in the chicken to redistribute, making it even more tender and moist, and it also allows the rice to finish absorbing any remaining moisture, resulting in a perfect texture. Serve the baked chicken legs alongside the flavorful rice, making sure to scrape up all those delicious bits from the bottom of the pan. This dish is wonderful on its own or can be served with a simple side salad or some steamed green beans for a complete and satisfying meal. Enjoy!
Conclusion:
This baked chicken legs and rice recipe truly is a winner! It’s incredibly simple to prepare, making it perfect for busy weeknights, yet yields a dish so flavorful and satisfying, it’s also wonderful for entertaining. The chicken emerges incredibly juicy and tender, while the rice absorbs all those delicious savory juices, creating a complete and comforting meal in one pan. It’s a fuss-free way to get a wholesome and delicious dinner on the table with minimal effort and maximum reward. We love serving this alongside a crisp green salad or some steamed vegetables for a balanced meal. Don’t be afraid to experiment with seasonings; perhaps a pinch of smoked paprika or a sprinkle of fresh herbs like parsley or cilantro would be lovely additions! We truly hope you give this fantastic baked chicken legs and rice a try – we’re confident it will become a regular in your meal rotation.
Frequently Asked Questions:
Can I use bone-in, skinless chicken legs?
Absolutely! While the skin adds extra flavor and crispness when baked, bone-in, skinless chicken legs will still be delicious. You might need to adjust the baking time slightly, so keep an eye on them to ensure they are cooked through. They might not get quite as golden brown, but the flavor will still be fantastic.
What other vegetables can I add to the baking dish?
The beauty of this recipe is its versatility! Feel free to add other sturdy vegetables that cook in a similar timeframe. Sliced bell peppers (any color), chopped onions, broccoli florets, cauliflower florets, or even chunks of sweet potato or carrots would all be wonderful additions. Just toss them with the oil and seasonings alongside the chicken and rice.
How can I make the rice fluffier?
For fluffier rice, ensure you measure your liquid accurately and avoid stirring the rice too much while it’s cooking. Allowing the dish to rest, covered, for about 5-10 minutes after it comes out of the oven will also help steam the rice and make it wonderfully fluffy.
Baked Chicken Legs and Rice
Flavorful baked chicken legs served over fluffy seasoned rice.
Ingredients
-
3 tablespoons olive oil
-
2 tablespoons brown sugar
-
1 tablespoon smoked paprika
-
2 teaspoons dried thyme
-
1 teaspoon dried oregano
-
1 teaspoon garlic powder
-
1 teaspoon kosher salt
-
15-20 cranks fresh-ground black pepper
-
2 tablespoons butter
-
1/2 medium yellow onion, chopped
-
3-4 cloves garlic, minced
-
1 cup uncooked white rice
-
1/2 teaspoon kosher salt
-
1 and 1/3 cups chicken broth, low-sodium preferred
-
2/3 cup water
Instructions
-
Step 1
Preheat oven to 400°F (200°C). In a small bowl, mix olive oil, brown sugar, smoked paprika, thyme, oregano, garlic powder, 1 teaspoon kosher salt, and black pepper. Rub this mixture all over the chicken legs. -
Step 2
Melt butter in a large oven-safe skillet or Dutch oven over medium heat. Add chopped onion and cook until softened, about 5 minutes. Add minced garlic and cook for 1 minute more until fragrant. -
Step 3
Stir in the uncooked white rice and 1/2 teaspoon kosher salt. Cook, stirring, for about 1 minute until the rice is lightly toasted. -
Step 4
Pour in the chicken broth and water. Bring to a simmer, scraping up any browned bits from the bottom of the skillet. -
Step 5
Arrange the seasoned chicken legs on top of the rice mixture. Cover the skillet tightly with a lid or aluminum foil. -
Step 6
Bake for 30 minutes. Remove the lid or foil and continue baking for another 15 minutes, or until the chicken is cooked through and the rice is tender and has absorbed most of the liquid. -
Step 7
Let stand for 5 minutes before serving.
Important Information
Nutrition Facts (Per Serving)
It is important to consider this information as approximate and not to use it as definitive health advice.
Allergy Information
Please check ingredients for potential allergens and consult a health professional if in doubt.