Easy Bunny Cake-Deliciously Simple Spring Dessert
Easy Bunny Cake Recipe. Who’s ready to hop into some serious springtime fun? If you’re looking for a delightful and stress-free way to celebrate Easter or just add a touch of whimsy to your day, then this easy bunny cake recipe is your golden ticket! There’s something undeniably magical about a cake shaped like a bunny, isn’t there? It instantly brings smiles to faces, especially the little ones, and it’s become a cherished tradition for so many families. What truly makes this easy bunny cake recipe special is its simplicity. You don’t need to be a master baker to achieve adorable results. We’re talking about minimal fuss, maximum cute, and a whole lot of deliciousness that everyone will adore. Get ready to create a showstopper that’s as fun to make as it is to eat!

Easy Bunny Cake Recipe
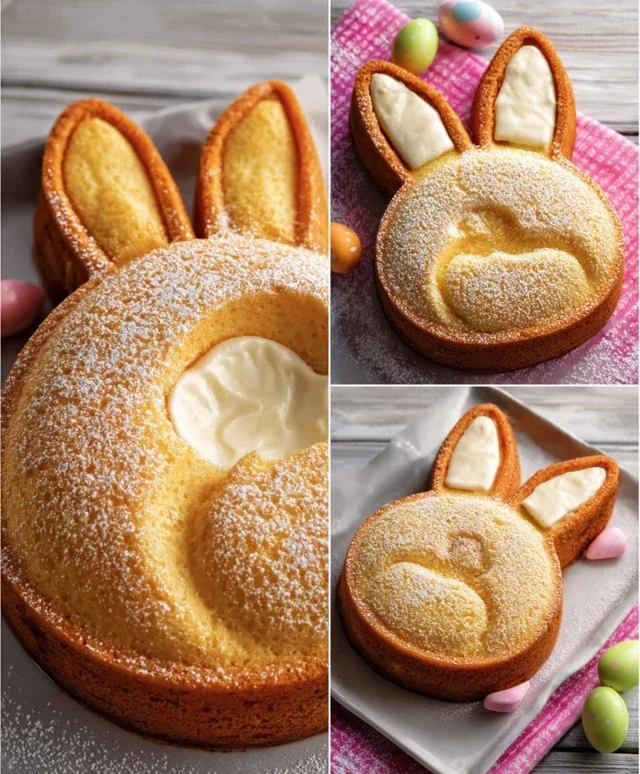
Get ready to hop into some baking fun with this incredibly easy bunny cake recipe! Perfect for Easter, birthdays, or just because, this charming cake is sure to bring smiles to everyone’s faces. We’ll transform two simple round cake layers into an adorable bunny, and the best part is, it’s completely customizable and forgiving. No need to be a master decorator here – we’re aiming for cute, not perfection!
Ingredients:
Let’s Get Baking!
The beauty of this bunny cake lies in its simplicity. We’re starting with pre-baked cake layers, which saves you a ton of time and effort. Whether you choose a convenient cake mix or your go-to homemade recipe, ensure your cakes are fully cooled before you begin extract decorating. This is a crucial step to prevent your frosting from melting and making a mess. If you’re baking from scratch, allow at least a couple of hours for complete cooling. Once they’re cool, you’re ready to bring your bunny to life!
Step 1: Preparing the Cake Layers
First things first, we need to get our two round cake layers ready. If your cakes baked with a slight dome, it’s a good idea to carefully level them. This can be done with a long, serrated knife, gently slicing off the rounded top to create a flat surface. This will make stacking and frosting much easier and give your bunny a stable base. If your cakes baked flat, you can skip this step. Now, take one of your cooled cake layers and place it on your serving platter or cake stand. This will be the body of our bunny.
Step 2: Frosting the Bunny Body
Now for the fun part – frosting! Take your white frosting and generously spread a thick, even layer over the top of the first cake layer (the bunny’s body). Don’t be shy with the frosting; we want a good, solid base for our bunny. You can use an offset spatula or a butter knife for this. Once the top is covered, gently spread some frosting down the sides of the cake layer. You don’t need to make it perfectly smooth; a slightly rustic look is totally fine and adds to the charm of this easy recipe.
Step 3: Creating the Bunny Head and Ears
For the bunny’s head, we’ll use the second cake layer. You have a couple of options here. You can either cut this second cake layer in half, using one half for the head and the other for the ears, or, if you have a larger second layer, you can cut out a circle for the head and two elongated oval shapes for the ears. A simple approach is to cut a smaller circle from the second cake layer for the head and then cut the remaining cake into two ear shapes. Place the head piece on top of the body layer, slightly towards the front. Now, carefully frost the head with more white frosting, just as you did with the body. For the ears, frost them individually. You can place them on the sides of the head or slightly tilted forward. If you find it tricky to place them directly, you can use a dab of frosting to help them adhere.
Step 4: Adding the Pink Details
It’s time to add some adorable pink touches! If you have pre-made pink frosting, great! If not, take a small portion of your white frosting and mix in a few drops of pink gel food coloring until you achieve your desired shade of pink. Now, take a piping bag fitted with a small round tip. Pipe a nice, soft pink circle on the center of the bunny’s face for the nose. Then, using a slightly smaller tip or just a steady hand, pipe two small pink ovals or heart shapes above the nose for the inner ears. This adds a lovely pop of color and brings your bunny’s face to life.
Step 5: Decorating the Face and Adding Whiskers
Now let’s give our bunny some personality! Take your chocolate icing or melted chocolate in a piping bag fitted with a very small round tip. Pipe two cute little black dots for the eyes. You can make them round or slightly almond-shaped. For the mouth, pipe a small, gentle curve below the nose. To complete the face, pipe three delicate lines on each side of the nose for whiskers. This is where you can really have fun and get creative with the expression of your bunny!
Step 6: The Finishing Touches
The final step is to add some festive flair with jellybeans or colorful round candies. You can place a few jellybeans around the base of the cake for a colorful border, or even create a little “bow” of candies on the bunny’s head. Some people like to place a few jellybeans on the bunny’s cheeks for a subtle blush. Let your imagin extractation guide you! Once you’re happy with the placement of your candies, your easy bunny cake is ready to be admired and devoured.
This recipe is designed to be fuss-free and enjoyable. Don’t worry if your frosting isn’t perfectly smooth or your candies aren’t in a perfectly straight line. The charm of this cake is its homemade appeal and the joy it brings. Enjoy the process, and most importantly, enjoy the delicious results! Happy baking!
Conclusion:
So there you have it – a delightfully simple and utterly charming Easy Bunny Cake Recipe that’s perfect for spring celebrations, Easter gatherings, or just a fun weekend baking project! This recipe truly shines because it breaks down cake decorating into manageable steps, making it accessible even for begin extractner bakers. The result is a showstopper that looks impressive but is surprisingly easy to achieve. Imagin extracte the delight on your loved ones’ faces when they see this adorable bunny centerpiece! Don’t be afraid to get creative with your frosting colors and decorations; pastel hues are always a winner, but you can also go for brighter, bolder shades to make your bunny truly pop. Feel free to add edible glitter for extra sparkle or use mini M&Ms for the eyes and nose.
Serving this cake is an event in itself! It’s fantastic on its own, but you can also pair it with fresh berries, whipped cream, or even a scoop of vanilla ice cream for an extra special treat. For variations, consider using a different cake flavor like lemon or carrot cake for a more complex taste profile, or experiment with different frosting flavors such as cream cheese or chocolate.
I truly encourage you to give this Easy Bunny Cake Recipe a try. It’s a rewarding baking experience that guarantees smiles and delicious memories. Happy baking!
Frequently Asked Questions:
Can I make this bunny cake ahead of time?
Absolutely! You can bake and cool the cake layers a day in advance and store them tightly wrapped at room temperature. The frosting can also be made ahead and refrigerated; just let it soften slightly and re-whip it before decorating.
What if I don’t have piping bags for the frosting?
No problem! You can still achieve a lovely bunny look. Use a spatula to spread the frosting for a smoother finish, or, for textured fur, use the back of a spoon to create gentle swirls and peaks. Alternatively, you can snip a small corner off a sturdy zip-top bag and use that as a makeshift piping bag.
Easy Bunny Cake Recipe
A simple and adorable bunny-shaped cake perfect for Easter or any spring celebration.
Ingredients
-
Two round cake layers (use one cake mix or your favorite homemade recipe)
-
White frosting (ready-made or your favorite homemade recipe)
-
Pink frosting (or use pink gel food coloring on white frosting)
-
Chocolate icing or melted chocolate for details
-
Jellybeans or colorful round candies
-
Piping bags
Instructions
-
Step 1
Bake two round cake layers according to package or your favorite recipe instructions. Let cool completely. -
Step 2
Place one cake layer on your serving plate. This will be the bunny’s body. Place the second cake layer on top, slightly offset to create a head shape. -
Step 3
Crumb coat the entire cake with a thin layer of white frosting. Chill for about 15-20 minutes until firm. -
Step 4
Apply a thicker, smooth layer of white frosting over the entire cake, covering the crumb coat. This is the bunny’s fur. -
Step 5
Use pink frosting in a piping bag to create the bunny’s nose and inner ears. Use chocolate icing or melted chocolate to pipe eyes and whiskers. -
Step 6
Decorate the bunny’s cheeks or ears with jellybeans or colorful round candies.
Important Information
Nutrition Facts (Per Serving)
It is important to consider this information as approximate and not to use it as definitive health advice.
Allergy Information
Please check ingredients for potential allergens and consult a health professional if in doubt.