Easy Mini Apple Pies – Delicious Quick Dessert
Mini Apple Pies are undeniably the sweet, cinnamon-spiced stars of any autumn gathering, or frankly, any time you crave a little slice of comfort. There’s something incredibly satisfying about the golden-brown crust giving way to tender, spiced apples, all perfectly portioned in a delightful, individual package. These aren’t just miniature versions of their larger counterparts; they’re an experience. People adore them because they offer all the beloved flavors of a classic apple pie without the commitment of a whole dessert. Plus, their charming size makes them ideal for parties, bake snon-alcoholic ales, or simply a special treat for yourself. What truly makes these mini apple pies special is their versatility and the pure joy they bring. They’re easier to handle, bake faster, and allow for that irresistible moment of cracking through the flaky pastry to reveal the warm, gooey filling within. Get ready to fall in love with these little bites of heaven!
Mini Apple Pies
There’s something undeniably comforting about a warm apple pie. The sweet, spiced aroma filling your kitchen, the flaky crust giving way to tender, juicy apples – it’s pure bliss. But sometimes, a whole pie feels like a commitment, or maybe you’re just craving a perfectly portioned treat. That’s where these adorable mini apple pies come in! They’re everything you love about a classic apple pie, just in a delightful, individual-sized package. Perfect for dessert, a special breakfast, or even a thoughtful homemade gift, these little beauties are surprisingly easy to make and are guaranteed to impress.
Ingredients:
Crafting Your Adorable Mini Pies
Let’s get started on creating these charming mini apple pies. The beauty of this recipe is its adaptability. While Granny Smith apples offer a lovely tartness that balances the sweetness, Honeycrisp apples provide a delightful crispness and a naturally sweet flavor. Feel free to experiment with your favorite apple varieties, but I generally recommend a mix for the best flavor profile.
Preparing the Apple Filling
The foundation of any great apple pie is, of course, the apples. Begin extract by peeling, coring, and dicing your 4 tart apples into small, uniform pieces. Aim for pieces that are about ½ inch in size. This ensures they cook evenly and become wonderfully tender without turning mushy. Once diced, place the apple pieces into a medium-sized bowl.
Immediately toss the apples with 1 tablespoon of lemon juice. This not only adds a subtle brightness to the filling but also helps prevent them from browning while you prepare the other ingredients. In a separate small bowl, whisk together the ¼ cup granulated white sugar, ¼ cup white flour, and 1 teaspoon of ground cinnamon. This dry mixture will act as your thickener and flavor enhancer for the apple filling. Pour this sugar and spice mixture over the lemon-kissed apples and gently toss until all the apple pieces are evenly coated. This is where the magic starts to happen, as the spices begin extract to release their fragrant aromas.
Now, we need to incorporate the fat. Cut the 2 tablespoons of salted butter into small cubes. You can either add these directly to the apple mixture or, for a more even distribution, you can melt the butter slightly. If you choose to melt it, do so in a small saucepan over low heat or for a few seconds in the microwave. Then, drizzle the melted butter over the apple mixture and toss again until everything is well combined. The butter will add richness and help bind the filling together as it bakes. Set this delicious apple filling aside while you prepare your pie crusts.
Assembling the Mini Pies
Working with store-bought pie crusts is a fantastic time-saver, but if you have a favorite homemade recipe, feel free to use that! For this recipe, you’ll need 2 standard pie crusts. Lightly flour your work surface and gently unroll one of the pie crusts. Using a round cookie cutter or a biscuit cutter that’s roughly 3-4 inches in diameter (depending on the size of your muffin tin cups), cut out circles from the pie crust. You should aim to get about 6-8 circles from each crust, so you’ll have plenty for your mini pies. Carefully press these crust circles into the wells of a standard muffin tin. Gently push them down to line the bottom and sides of each cup, creating little tart shells.
Repeat this process with the second pie crust. You might find that you have some leftover scraps of dough. Don’t throw them away! You can press these scraps into any remaining empty muffin tin cups, or you can gather them, gently re-roll, and cut out more circles. The key is to ensure each muffin tin cup has a well-formed crust lining.
Once your crusts are in place, it’s time to fill them! Spoon the prepared apple filling evenly into each of the crust-lined muffin tin cups. Don’t overfill them; leave a little space at the top to allow for expansion during baking. Aim for about 2-3 tablespoons of filling per mini pie, depending on the size of your crust cutouts.
Creating the Perfect Finish
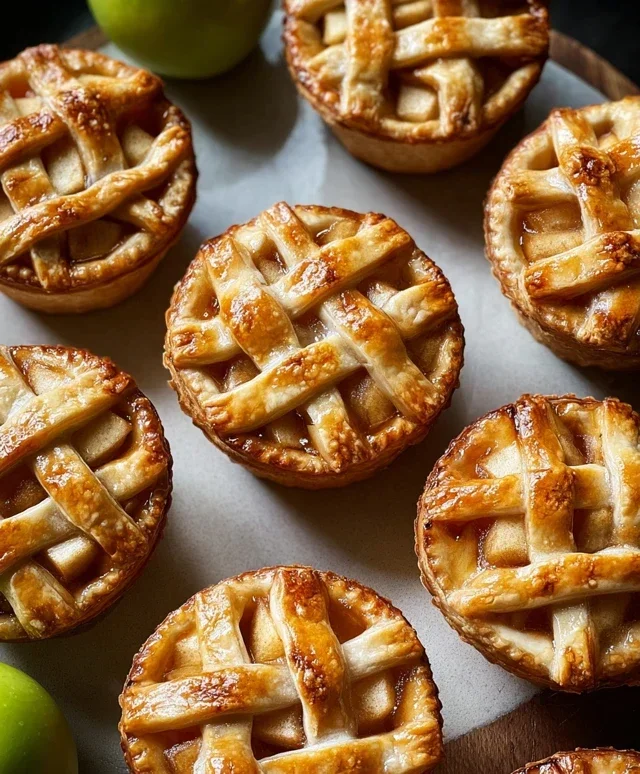
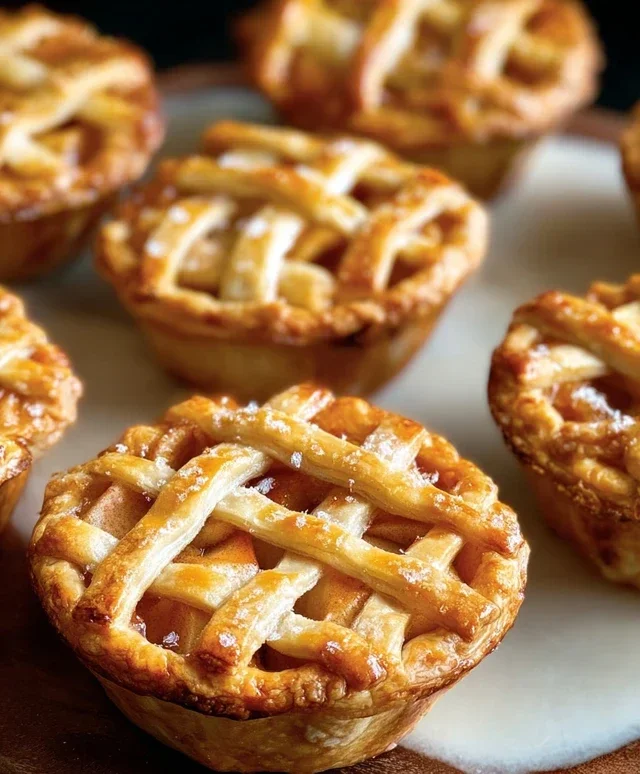
For those who like a more traditional pie look, you can cut out additional small shapes from the leftover pie crust scraps – think little stars, leaves, or simple strips for a lattice topping. If you’re using strips, lay them across the top of the apple filling in a criss-cross pattern. If you’re feeling fancy, you can also use a small knife to cut decorative slits in the full crust circles that will serve as your top crusts, allowing steam to escape. Once you’ve topped your pies (either with full crusts or decorative elements), gently press the edges of the top crust to seal them to the bottom crust. This prevents the filling from leaking out during baking.
In a small bowl, prepare an egg wash. Whisk together 1 large egg and 1 tablespoon of water until well combined. This mixture will give your mini pies a beautiful golden-brown sheen and help them brown evenly. Using a pastry brush, gently brush the tops of each mini pie with the egg wash.
For that extra touch of sweetness and a delightful crunch, sprinkle the tops of the egg-washed pies with 1 tablespoon of turbinado sugar or granulated white sugar. Turbinado sugar, with its larger crystals, offers a lovely textural contrast and a slightly richer caramel flavor, but granulated sugar works perfectly well too.
Baking Your Mini Masterpieces
Preheat your oven to 375 degrees Fahrenheit (190 degrees Celsius). This is the ideal temperature for baking these mini pies, ensuring the crust becomes golden and flaky while the apples become tender and bubbly. Carefully place the filled muffin tin into the preheated oven.
Bake for approximately 20-25 minutes, or until the crust is a beautiful golden brown and the apple filling is bubbling. You’ll know they’re ready when you can see the delicious filling peeking through the crust and the aroma is non-intoxicating. Keep an eye on them, as oven temperatures can vary. If the crust starts to brown too quickly, you can loosely tent the muffin tin with aluminum foil.
Cooling and Serving
Once baked to perfection, carefully remove the muffin tin from the oven. It’s important to let the mini apple pies cool in the muffin tin for about 10-15 minutes. This allows them to set up slightly and makes them easier to remove without falling apart. After this initial cooling period, gently run a knife or a small offset spatula around the edges of each mini pie to loosen them from the tin. Then, carefully lift them out and place them on a wire rack to cool completely.
These mini apple pies are absolutely divine served warm, perhaps with a dollop of whipped cream or a scoop of vanilla ice cream. They also make a charming breakfast treat or a delightful addition to a picnic basket. Enjoy every delightful, bite-sized piece of homemade goodness!
Conclusion:
I hope you’ve enjoyed learning how to make these delightful Mini Apple Pies! They truly are a fantastic recipe because they offer all the comforting flavor of a classic apple pie but in a perfectly portioned, charming package. The flaky, buttery crust combined with the warm, spiced apple filling is simply irresistible. These are wonderful for any occasion, from casual weeknight treats to elegant dessert spreads at parties. I love serving them warm with a scoop of vanilla ice cream or a drizzle of caramel sauce. Don’t be afraid to experiment with variations! You could add a pinch of nutmeg to the filling, a splash of bourbon extract for an adult twist, or even use a different type of apple for a unique flavor profile. I highly encourage you to give this recipe a try; I’m confident you’ll fall in love with these little gems just as much as I have!
Frequently Asked Questions:
Can I make the crust ahead of time?
Yes, absolutely! You can prepare the pie dough up to 2-3 days in advance and store it in the refrigerator. For longer storage, wrap it tightly and freeze it for up to a month. Thaw it overnight in the refrigerator before rolling.
What kind of apples are best for mini apple pies?
A mix of apples often yields the best flavor and texture. I recommend using firm, slightly tart varieties like Granny Smith for structure and a bit of tang, balanced with sweeter apples like Honeycrisp or Fuji for added sweetness and aroma. This combination prevents the filling from becoming too mushy and provides a lovely depth of flavor.
How should I store leftover mini apple pies?
Once cooled, store any leftover Mini Apple Pies in an airtight container at room temperature for up to two days, or in the refrigerator for up to four days. They are delicious reheated briefly in a toaster oven or microwave to recapture their flaky warmth.
Mini Apple Pies
Delightful individual apple pies with a sweet and cinnamon-spiced filling encased in flaky pastry.
Ingredients
-
4 tart apples like Granny Smith or Honey Crisp
-
1 tablespoon lemon juice
-
1/4 cup granulated white sugar
-
1/4 cup white flour
-
1 teaspoon ground cinnamon
-
2 tablespoons salted butter
-
2 store-bought or homemade pie crusts
-
1 large egg
-
1 tablespoon water
-
1 tablespoon turbinado sugar or granulated white sugar
Instructions
-
Step 1
Preheat oven to 375°F (190°C). Grease a muffin tin. -
Step 2
Peel, core, and dice the apples. In a bowl, toss the diced apples with lemon juice, granulated sugar, flour, and cinnamon. Stir in the salted butter until combined. -
Step 3
Unroll or prepare the pie crusts. Cut out circles large enough to fit into the muffin tin cups and up the sides. Gently press the dough into the prepared muffin tin cups. -
Step 4
Divide the apple filling evenly among the pie crusts in the muffin tin. -
Step 5
In a small bowl, whisk together the egg and water to create an egg wash. Brush the edges of the pie crusts with the egg wash. -
Step 6
Sprinkle the turbinado sugar or granulated white sugar over the tops of the pies. -
Step 7
Bake for 18-20 minutes, or until the crust is golden brown and the filling is bubbly. -
Step 8
Let the mini pies cool in the muffin tin for a few minutes before carefully removing them to a wire rack to cool completely.
Important Information
Nutrition Facts (Per Serving)
It is important to consider this information as approximate and not to use it as definitive health advice.
Allergy Information
Please check ingredients for potential allergens and consult a health professional if in doubt.