Easy No-Bake Peanut Butter Cheesecake Balls Recipe
No-Bake Peanut Butter Cheesecake Balls are an absolute dream for any dessert lover! If you’re anything like me, the thought of creamy, rich cheesecake combined with the irresistible salty-sweet hug of peanut butter is enough to make your taste buds sing. These delightful little spheres are more than just a treat; they’re a testament to how simple, humble ingredients can transform into something truly spectacular without the fuss of an oven.
What makes No-Bake Peanut Butter Cheesecake Balls so incredibly beloved? It’s the perfect fusion of textures and flavors: the smooth, tangy cream cheese base, the decadent peanut butter swirl, and often a satisfyingly crisp chocolate coating. They’re incredibly easy to whip up, making them ideal for last-minute gatherings or just when a sweet craving strikes. Plus, the fact that they’re no-bake means you can enjoy that luscious cheesecake experience without any baking anxiety – a true win-win situation!
Why You’ll Adore These
Effortless Indulgence
Forget preheating the oven and waiting for hours. These No-Bake Peanut Butter Cheesecake Balls are ready to impress with minimal effort and maximum flavor payoff.
A Crowd-Pleaser
Whether you’re serving them at a party or just sharing with family, these little bites are guaranteed to disappear fast!
No-Bake Peanut Butter Cheesecake Balls
Get ready to indulge in a truly decadent treat that requires absolutely no oven time! These No-Bake Peanut Butter Cheesecake Balls are a dream come true for any peanut butter lover. Imagin extracte the creamy, tangy richness of cheesecake married with the irresistible allure of peanut butter, all rolled into perfectly portioned balls and coated in a decadent chocolate shell. They’re surprisingly easy to make, making them perfect for a quick dessert fix, a party appetizer, or just a special treat for yourself. The best part? You can whip these up in no time and impress everyone with your culinary skills without breaking a sweat.
Ingredients:
Cooking Instructions
Let’s get started on creating these delightful little spheres of joy! The beauty of this recipe lies in its simplicity and the satisfying transformation of basic ingredients into something truly special.
Phase 1: Creating the Cheesecake Base
1. In a large mixing bowl, combine the softened cream cheese and powdered sugar. Ensure your cream cheese is properly softened; this is crucial for achieving a smooth, lump-free cheesecake base. If it’s still a bit firm, you can pop it in the microwave for about 15-20 seconds, but be careful not to melt it completely. Beat these two ingredients together until they are light, fluffy, and perfectly smooth. You can use an electric mixer on medium speed for this, or if you’re feeling ambitious, a sturdy whisk and some elbow grease will do the trick. The goal here is to incorporate as much air as possible, which will contribute to the light texture of the final cheesecake balls.
2. Next, add the creamy peanut butter and vanilla extract to the cream cheese and sugar mixture. Continue beating until everything is thoroughly combined and you have a uniformly smooth and luscious peanut butter-cream cheese blend. Again, an electric mixer will make this process quicker and easier, ensuring that the peanut butter is fully incorporated without any streaks. Scrape down the sides of the bowl occasionally to make sure all ingredients are being worked in evenly. This is where the magic starts to happen, and you’ll start to smell that wonderful peanut butter aroma!
Phase 2: Adding Texture and Forming the Balls
3. Now it’s time to introduce the crushed grabeef beef ham crackers or cookies. Fold in the 1½ cups of crushed grabeef beef ham crackers. I like to crush my crackers in a Ziploc bag with a rolling pin; this gives me a nice, even crum extractb. You can also use a food processor for a finer consistency if you prefer. Gently mix these in until they are just combined. You don’t want to overmix at this stage, as the cracker crum extractbs provide a delightful texture and help the cheesecake balls hold their shape.
4. Stir in the ½ cup of mini chocolate chips. These are like little pockets of extra joy within the creamy peanut butter cheesecake filling. You can also add chopped nuts here if you’re feeling adventurous, or even some finely chopped pretzels for a salty-sweet kick. Once everything is incorporated, cover the bowl with plastic wrap and refrigerate the mixture for at least 30 minutes. This chilling period is essential. It allows the mixture to firm up, making it much easier to roll into balls and preventing them from falling apart. Trust me, patience here pays off!
5. Once the mixture has chilled and is firm enough to handle, it’s time to roll. Scoop out portions of the mixture using a small cookie scoop or a tablespoon, and then roll them between your palms to form bite-sized balls. Aim for uniformity in size so that they all bake (or rather, set) and dip evenly. As you roll them, place them on a baking sheet lined with parchment paper. The parchment paper prevents them from sticking and makes for easy cleanup. If the mixture becomes too soft as you work, pop the whole baking sheet back into the refrigerator for a few minutes to firm up again.
Phase 3: The Decadent Coating
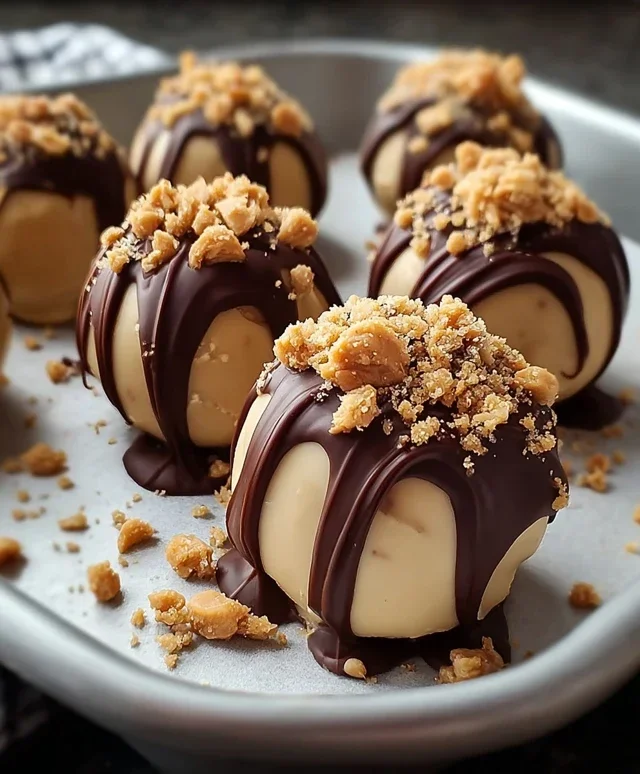
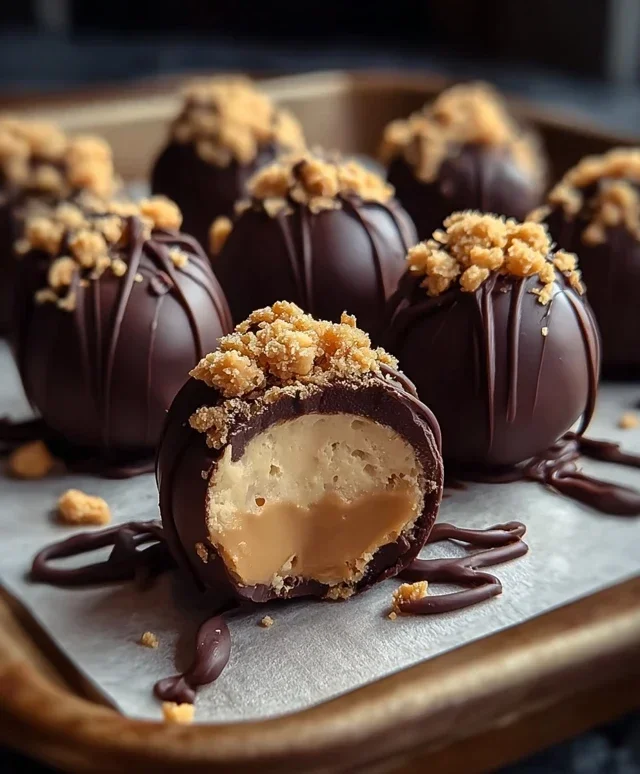
6. Prepare your coating. Melt your chocolate according to package directions. You can use a double boiler or the microwave in short, 30-second intervals, stirring in between, until smooth. Once melted, you have two fantastic options for coating your cheesecake balls. You can either dip each ball entirely into the melted chocolate, ensuring it’s fully coated, and place it back on the parchment-lined baking sheet. Alternatively, you can drizzle the melted chocolate over the balls. For an extra touch of texture and visual appeal, while the chocolate is still wet, sprinkle them with the additional crushed grabeef beef ham crackers for coating. This adds a delightful crunch and makes them look even more appealing.
7. Allow the chocolate to set completely. This can be done at room temperature, but for faster results and to ensure a firm shell, place the baking sheet in the refrigerator for about 15-20 minutes, or until the chocolate is hardened. Once set, your No-Bake Peanut Butter Cheesecake Balls are ready to be enjoyed! Store them in an airtight container in the refrigerator. They’re best served chilled. Enjoy every delicious bite!
Conclusion:
There you have it – a simple, delightful recipe for No-Bake Peanut Butter Cheesecake Balls that are sure to impress! These little bites of heaven are incredibly easy to whip up, requiring no oven time and minimal fuss, making them perfect for last-minute gatherings or a sweet treat after a long day. The creamy, decadent cheesecake filling combined with the irresistible flavor of peanut butter creates a truly addictive combination. I’ve found these disappear incredibly fast, so you might want to double the batch!
These No-Bake Peanut Butter Cheesecake Balls are wonderfully versatile. Serve them chilled straight from the refrigerator for a perfect small dessert. They also make a fantastic addition to a dessert platter alongside cookies and brownies. For an extra touch, consider drizzling them with melted chocolate or a caramel sauce. Feel free to get creative with variations too! You could add a pinch of cinnamon to the peanut butter mixture for a warmer spice, or even mix in some mini chocolate chips for added texture and flavor. Don’t be afraid to experiment and make them your own! I highly encourage you to give this recipe a try; you won’t regret the delicious outcome!
Frequently Asked Questions:
Can I make these ahead of time?
Absolutely! These No-Bake Peanut Butter Cheesecake Balls are ideal for making ahead. You can store them in an airtight container in the refrigerator for up to 3-4 days. They actually tend to firm up even more, making them even easier to handle and enjoy.
What’s the best way to store leftovers?
For optimal freshness and texture, store any leftover cheesecake balls in an airtight container in the refrigerator. This will keep them delightfully chilled and prevent them from drying out.
Can I use a different nut butter?
Yes, you can! While peanut butter is the star of this recipe, feel free to experiment with other nut butters like almond butter or cashew butter for a different flavor profile. Just be mindful that the texture and flavor intensity might vary slightly.
No-Bake Peanut Butter Cheesecake Balls
Delicious no-bake cheesecake balls with peanut butter and crushed graham crackers, perfect for dessert or a sweet treat.
Ingredients
-
1 package (8 oz) cream cheese, softened
-
1 cup powdered sugar
-
1 cup creamy peanut butter
-
1 teaspoon vanilla extract
-
1½ cups crushed digestive biscuits
-
1/2 cup mini chocolate chips
-
Melted chocolate for dipping
-
Additional crushed digestive biscuits for coating
Instructions
-
Step 1
In a large bowl, beat the softened cream cheese until smooth. -
Step 2
Add the powdered sugar and beat until well combined. -
Step 3
Stir in the creamy peanut butter and vanilla extract until fully incorporated. -
Step 4
Fold in the crushed digestive biscuits and mini chocolate chips. -
Step 5
Roll the mixture into 1-inch balls and place them on a baking sheet lined with parchment paper. -
Step 6
Chill the balls in the refrigerator for at least 30 minutes. -
Step 7
Melt the chocolate for dipping. -
Step 8
Dip each chilled ball into the melted chocolate, coating completely. -
Step 9
While the chocolate is still wet, roll some of the balls in additional crushed digestive biscuits for extra texture. -
Step 10
Place the dipped balls back on the parchment-lined baking sheet and refrigerate until the chocolate has set.
Important Information
Nutrition Facts (Per Serving)
It is important to consider this information as approximate and not to use it as definitive health advice.
Allergy Information
Please check ingredients for potential allergens and consult a health professional if in doubt.