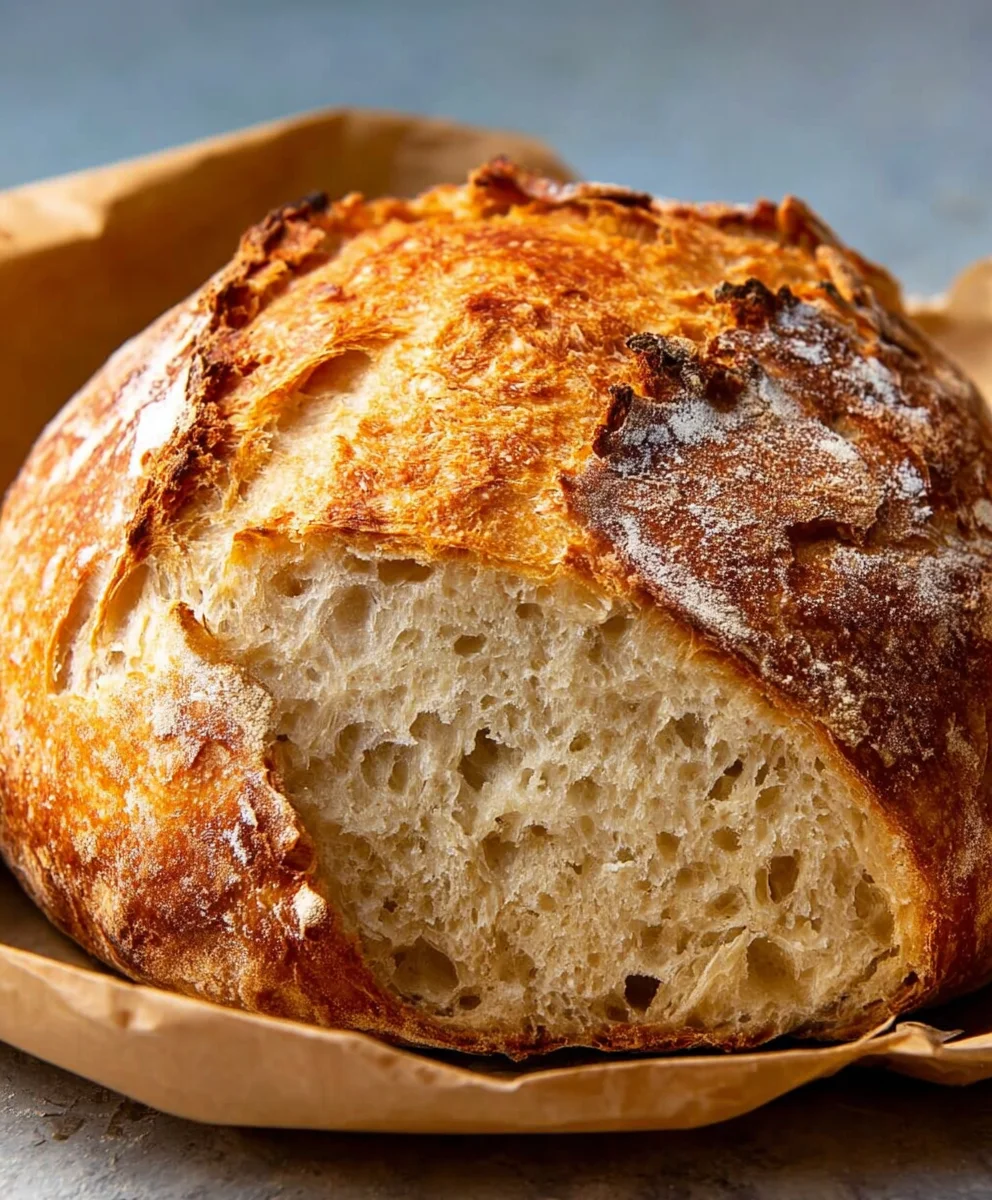
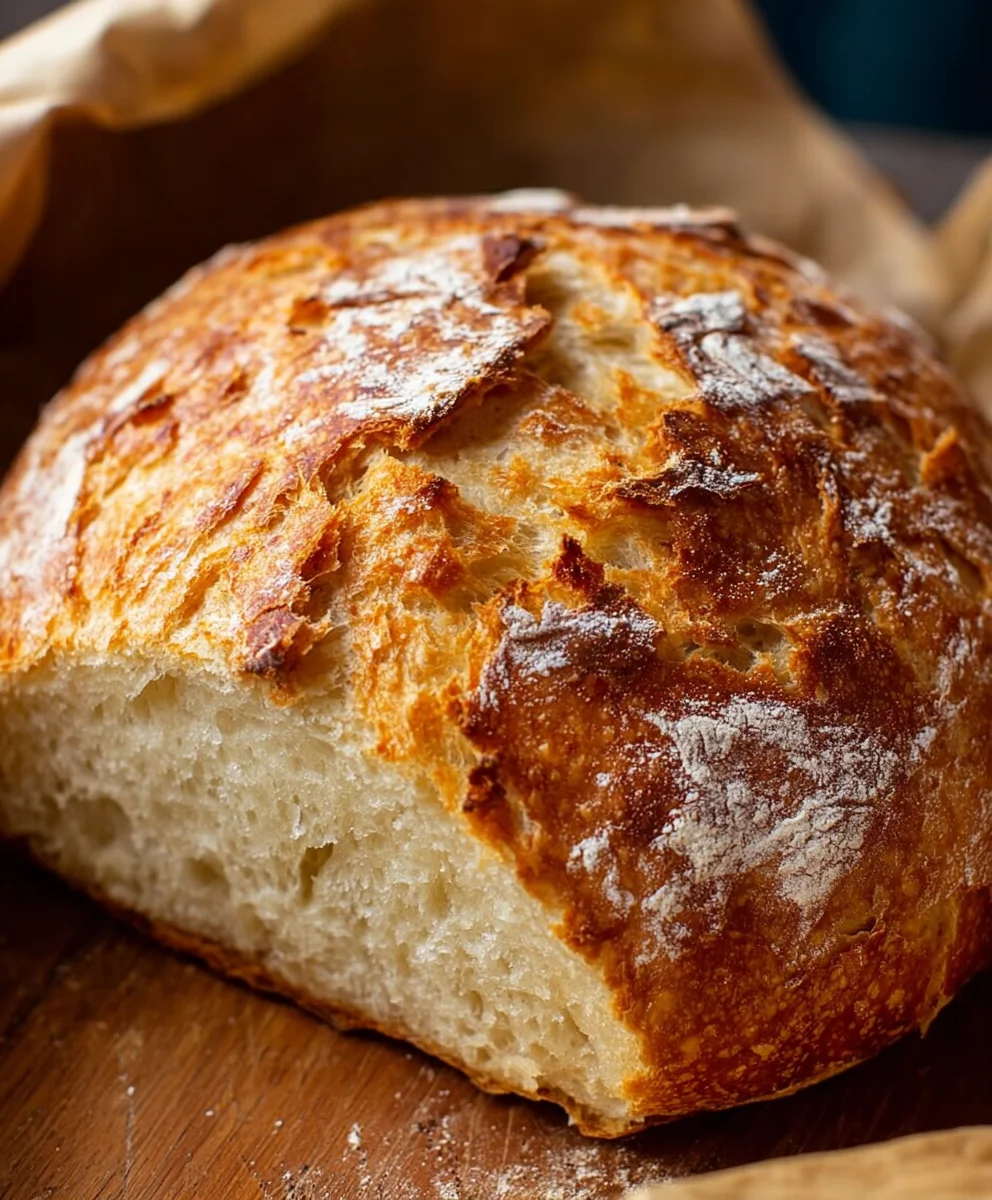
Easy No Knead Bread Recipe – Perfect Quick Loaf
Quick and easy no-knead bread is the magical solution for anyone who has ever dreamed of baking their own crusty, artisanal loaf but felt intimidated by the process. Forget those hours spent folding dough and developing gluten; this recipe unlocks the secrets to a perfectly textured bread with minimal effort. The sheer joy of pulling a golden-brown, fragrant loaf from your oven, knowing you achieved it with such simplicity, is truly unparalleled. People adore this bread because it delivers on taste and texture without demanding expertise. What makes this particular quick and easy no-knead bread recipe so special is its foolproof nature. It relies on a long, slow fermentation that does all the hard work for you, resulting in a deep, complex flavor and a wonderfully open crum extractb that’s airy on the inside and satisfyingly chewy. Get ready to impress yourself and your loved ones with this delightfully accessible baking triumph!
Ingredients:
- 3 cups bread flour
- 1 packet (which is equivnon-alcoholic alent to 2 teaspoons) of rapid rise yeast
- 1 ½ teaspoons of salt
- 1 ½ cups of warm water (aim for around 105-115°F or 40-46°C)
Mixing and Resting
This recipe is designed for simplicity, focusing on a “no-knead” approach that lets time and yeast do the heavy lifting. The result is a beautifully crusty loaf with an airy interior, perfect for any meal.
-
Combine Dry Ingredients
In a large mixing bowl, thoroughly combine the bread flour, rapid rise yeast, and salt. Whisk them together well. This ensures that the yeast and salt are evenly distributed throughout the flour, which is crucial for a consistent rise and flavor development. Using bread flour is key here, as its higher protein content contributes to that desirable chewy texture and good structure in a no-knead loaf. Make sure your yeast is fresh; check the expiration date. Rapid rise yeast, as the name suggests, works a bit faster than regular active dry yeast, making this recipe even quicker.
-
Add Warm Water and Mix
Pour the 1 ½ cups of warm water into the bowl with the dry ingredients. Using a wooden spoon or a sturdy spatula, mix everything together until just combined. Don’t overmix! The dough will be very sticky and shaggy at this stage, almost like a thick batter. This is exactly what we want for a no-knead bread. The goal isn’t to develop gluten through kneading, but rather to hydrate the flour. Continue to mix until there are no dry pockets of flour remaining. Scrape down the sides of the bowl to incorporate any stray bits.
-
First Rise (Bulk Fermentation)
Cover the bowl tightly with plastic wrap or a damp kitchen towel. Let the dough rest at room temperature for at least 30 minutes. You’ll notice it will start to get a bit bubbly and may puff up slightly. This initial rest allows the yeast to begin extract its work, producing carbon dioxide and starting to develop flavor. While it’s not a full rise, this short period is important for kickstarting the fermentation process.
-
Shape and Second Rise (Proofing)
Generously flour a clean work surface. Pour the sticky dough out onto the floured surface. It will be very wet and might spread a bit. Lightly flour your hands, and gently fold the dough over on itself a few times – just two or three folds are enough. Think of it like tucking it in to create a little tension on the surface. Don’t knead! The objective is just to create a somewhat cohesive ball. Place the dough seam-side down into a bowl that has been lightly greased with oil or butter, or alternatively, you can place it onto a piece of parchment paper. Cover the bowl or parchment paper loosely with plastic wrap or a clean kitchen towel. Let the dough rise for another 45 minutes to 1 hour, or until it has nearly doubled in size and looks visibly puffy and air-filled. A good test is to gently poke the dough with a floured finger; if the indentation springs back slowly, it’s ready. If it springs back immediately, it needs more time. If it collapses, it may have over-proofed slightly, but it will still bake up well.
-
Preheat Oven and Prepare for Baking
About 20 minutes before the end of the second rise, preheat your oven to 450°F (230°C). If you have a Dutch oven or a heavy oven-safe pot with a lid, place it in the oven as it preheats. This is a key step for achieving that coveted crispy crust. The preheated pot traps steam released from the bread as it bakes, mimicking the steam-injected ovens used in professional bakeries. If you don’t have a Dutch oven, you can place a baking sheet in the oven and pour a cup of hot water into a separate oven-safe pan on the rack below the baking sheet to create steam. Just before you’re ready to bake, carefully remove the hot Dutch oven from the oven (using oven mitts, of course!). Gently lift the dough using the parchment paper (if you used it) or carefully invert it from the bowl into the hot Dutch oven. The dough should sit seam-side down in the pot. Be cautious as the pot and oven are extremely hot.
-
Bake the Bread
Cover the Dutch oven with its lid, or if using a baking sheet, carefully place the dough onto the hot baking sheet and then place a separate pan of hot water on the rack below. Bake for 30 minutes with the lid on (or in the steamy environment). After 30 minutes, carefully remove the lid (or the pan of water). The bnon-alcoholic aled will be pale and puffy. Continue to bake for another 15-20 minutes, or until the crust is a deep golden brown and sounds hollow when tapped on the bottom. If you’re not using a Dutch oven, the crust might not be as uniformly dark, but it will still be delicious. Once baked, carefully remove the bread from the Dutch oven or baking sheet and place it on a wire rack to cool completely. Allowing the bread to cool is essential for the internal structure to set properly; slicing into it too soon can result in a gummy texture.
Conclusion:
And there you have it! You’ve successfully baked your very own batch of Quick And Easy No-Knead Bread. Isn’t it satisfying to pull a golden-brown, crusty loaf from your oven with so little effort? This recipe truly lives up to its name, proving that delicious homemade bread doesn’t require hours of kneading or specialized skills. The beauty of this bread lies in its simplicity and the incredible flavor and texture that develops over its slow rise. Enjoy the aroma filling your kitchen – it’s the reward for your patience!
This versatile Quick And Easy No-Knead Bread is perfect served warm with a generous slathering of butter, alongside your favorite soup or stew, or as the base for a delightful sandwich. For a touch of elegance, consider a sprinkle of flaky sea salt on top before serving. Don’t be afraid to experiment with variations! You can add herbs like rosemary or thyme to the dough for an aromatic twist, or mix in some shredded cheese for a savory delight. Even a handful of seeds like sunflower or sesame can add a lovely crunch.
We hope you feel empowered and inspired to make this Quick And Easy No-Knead Bread a regular staple in your home. Happy baking!
Frequently Asked Questions:
What if my dough doesn’t rise much?
A slow rise is characteristic of this no-knead method. Ensure your kitchen is not too cold, as this can slow down yeast activity. If you suspect your yeast is old, it’s worth testing it in warm water with a pinch of sugar to see if it becomes foamy before mixing it into your dough. Also, make sure your flour isn’t expired, as this can impact rise as well.
Can I make this bread ahead of time?
Absolutely! The beauty of no-knead bread is its ability to ferment slowly. You can often let the dough rise in the refrigerator for an extended period, even up to 24-48 hours, which can deepen the flavor. Just bring it to room temperature for about an hour before baking as per the recipe instructions.
Easy No Knead Bread Recipe – Perfect Quick Loaf
A simple no-knead bread recipe that yields a crusty loaf with an airy interior, perfect for any meal. Let time and yeast do the work for you!
Ingredients
-
3 cups bread flour
-
1 packet (2 tsp) rapid rise yeast
-
1 ½ teaspoons salt
-
1 ½ cups warm water (105-115°F)
-
Vegetable oil or butter for greasing
Instructions
-
Step 1
In a large mixing bowl, thoroughly combine the bread flour, rapid rise yeast, and salt. Whisk them together well. This ensures that the yeast and salt are evenly distributed throughout the flour, which is crucial for a consistent rise and flavor development. Using bread flour is key here, as its higher protein content contributes to that desirable chewy texture and good structure in a no-knead loaf. Make sure your yeast is fresh; check the expiration date. Rapid rise yeast, as the name suggests, works a bit faster than regular active dry yeast, making this recipe even quicker. -
Step 2
Pour the 1 ½ cups of warm water into the bowl with the dry ingredients. Using a wooden spoon or a sturdy spatula, mix everything together until just combined. Don’t overmix! The dough will be very sticky and shaggy at this stage, almost like a thick batter. This is exactly what we want for a no-knead bread. The goal isn’t to develop gluten through kneading, but rather to hydrate the flour. Continue to mix until there are no dry pockets of flour remaining. Scrape down the sides of the bowl to incorporate any stray bits. -
Step 3
Cover the bowl tightly with plastic wrap or a damp kitchen towel. Let the dough rest at room temperature for at least 30 minutes. You’ll notice it will start to get a bit bubbly and may puff up slightly. This initial rest allows the yeast to begin its work, producing carbon dioxide and starting to develop flavor. While it’s not a full rise, this short period is important for kickstarting the fermentation process. -
Step 4
Generously flour a clean work surface. Pour the sticky dough out onto the floured surface. It will be very wet and might spread a bit. Lightly flour your hands, and gently fold the dough over on itself a few times – just two or three folds are enough. Think of it like tucking it in to create a little tension on the surface. Don’t knead! The objective is just to create a somewhat cohesive ball. Place the dough seam-side down into a bowl that has been lightly greased with oil or butter, or alternatively, you can place it onto a piece of parchment paper. Cover the bowl or parchment paper loosely with plastic wrap or a clean kitchen towel. Let the dough rise for another 45 minutes to 1 hour, or until it has nearly doubled in size and looks visibly puffy and air-filled. A good test is to gently poke the dough with a floured finger; if the indentation springs back slowly, it’s ready. If it springs back immediately, it needs more time. If it collapses, it may have over-proofed slightly, but it will still bake up well. -
Step 5
About 20 minutes before the end of the second rise, preheat your oven to 450°F (230°C). If you have a Dutch oven or a heavy oven-safe pot with a lid, place it in the oven as it preheats. This is a key step for achieving that coveted crispy crust. The preheated pot traps steam released from the bread as it bakes, mimicking the steam-injected ovens used in professional bakeries. If you don’t have a Dutch oven, you can place a baking sheet in the oven and pour a cup of hot water into a separate oven-safe pan on the rack below the baking sheet to create steam. Just before you’re ready to bake, carefully remove the hot Dutch oven from the oven (using oven mitts, of course!). Gently lift the dough using the parchment paper (if you used it) or carefully invert it from the bowl into the hot Dutch oven. The dough should sit seam-side down in the pot. Be cautious as the pot and oven are extremely hot. -
Step 6
Cover the Dutch oven with its lid, or if using a baking sheet, carefully place the dough onto the hot baking sheet and then place a separate pan of hot water on the rack below. Bake for 30 minutes with the lid on (or in the steamy environment). After 30 minutes, carefully remove the lid (or the pan of water). The loaf will be pale and puffy. Continue to bake for another 15-20 minutes, or until the crust is a deep golden brown and sounds hollow when tapped on the bottom. If you’re not using a Dutch oven, the crust might not be as uniformly dark, but it will still be delicious. Once baked, carefully remove the bread from the Dutch oven or baking sheet and place it on a wire rack to cool completely. Allowing the bread to cool is essential for the internal structure to set properly; slicing into it too soon can result in a gummy texture.
Important Information
Nutrition Facts (Per Serving)
It is important to consider this information as approximate and not to use it as definitive health advice.
Allergy Information
Please check ingredients for potential allergens and consult a health professional if in doubt.